 Wiki
Wiki
Using Alchemist
This page provides a general rundown of how to use basic features of Alchemist.
Alchemist User Guide
Introduction
Alchemist is a tool that is used to combine additive animations for games like Black Ops 3 that don’t support their use, and instead require a singular animation, examples include sprint animations, gesture type animations, and many more. Alchemist also has IK functionality, meaning you can assign a specific bonename for the player’s hand to be perfectly attached to for the animation (used for things like different grip poses for foregrips and underbarrel attachments etc.) as well as generally fixing microstutters on the hands in animations that are exported since they are compressed in game causing such stutters.
Every COD game since Infinite Warfare has some kind of additive animation system, even Black Ops 4 and Cold War, however those two’s additives aren’t heavily supported currently in Alchemist as they do things differently on the legacy engine.
The next section will walk you through the fundamentals of setting up an Alchemist project.
Improving your Experience
Once Alchemist is installed, I recommend making folders for you to put source files in inside the Alchemist folder, for example I have a folder for Project Files, Source Files (raw animations and models) and a seperate Output Folder. All of these folders also have subfolders for each game codename to make finding certain files easier.
This is optional but can make your life a lot easier when working with all the different files in the program.
Tools and General Source Files
Once that’s done, I recommend extracting some basic files that you will use a lot. For any game post MW19, this set of viewhands from MW19 (viewhands_mp_base_iw8) is a good idea to get since we need to use a model that has the viewhands skeleton of the game you’re working with.
(If you are using the pre-existing conversion Rig for IW8-T7 for Maya, then you MUST use this model since it shares the same bone structure as the viewhands model the conversion rig uses, which will cause problems otherwise if you are not using this model)
If you don’t have that file, you can find a version of it here that works for the latest Maya versions. Here is also the link for the updated COD plugins for Maya 2022+ as well.
Finding your Source Files
Now that you have your source skeleton model, I recommend you also extract the weapon models and animations for the weapon that you want to use. You should export all the weapon’s animations as you may not know which animations you need yet at this point.
You can find weapon codenames typically on the COD fandom wiki page for the weapon you want, or you can use the preview feature in Saluki (pressing P) to view models in a built-in model viewer, which can help you look through the weapons to find the one you want.
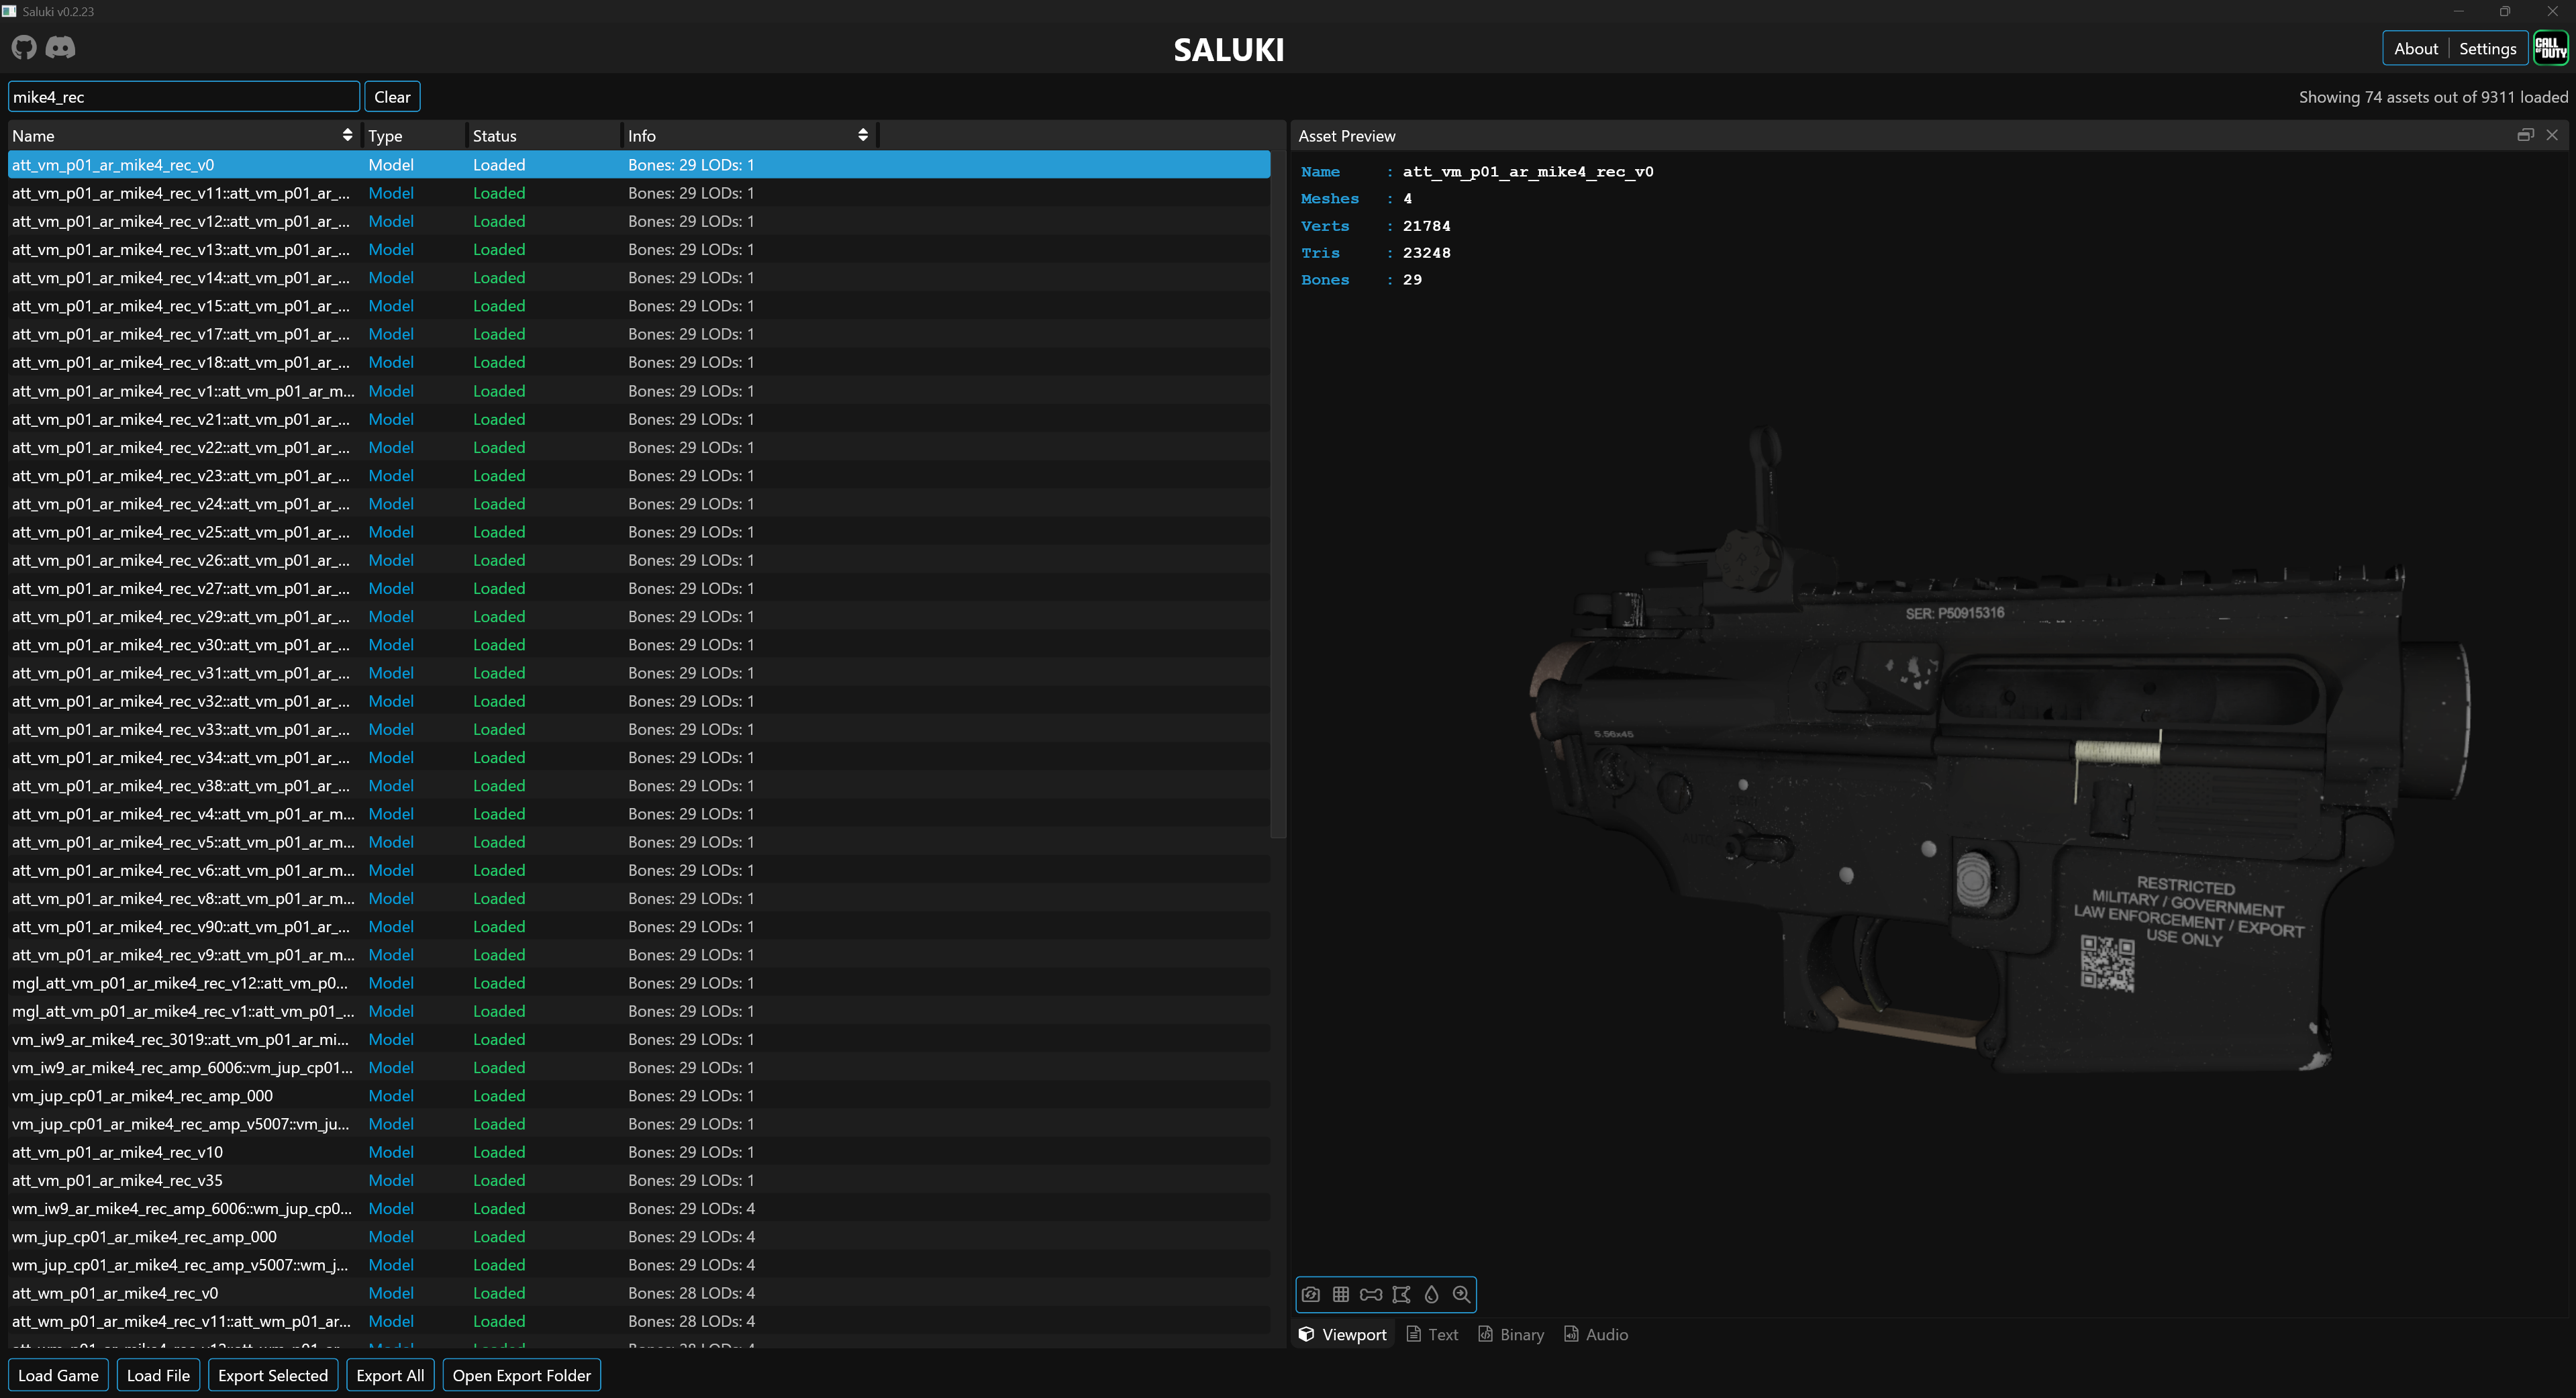
Once you have all of your weapon parts, you can then combine them using ModelMerger, this tool will merge all the .cast models to form the full gun (MW19+ splits the whole gun into parts like receiver, barrel, mag, pistolgrip, stock etc. for mixing parts in the gunsmith and weapon bundles).
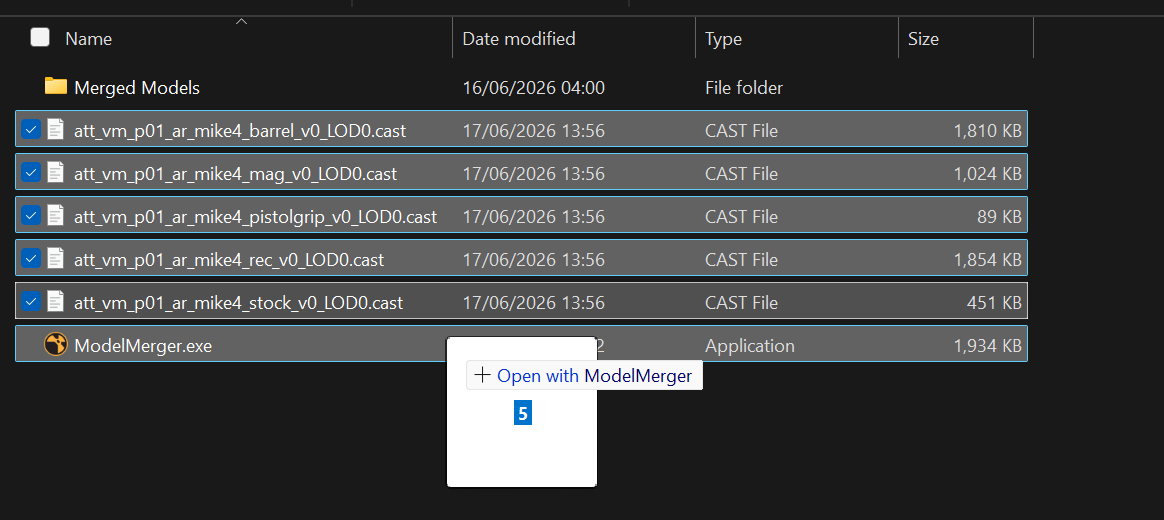
We need to do this so we can use the model in Alchemist for it to use the bones to form the new animations, just like how we need the viewhands for it’s skeleton.
Now we have our source files, we can open Alchemist and start to build our animations.
Creating the Project File
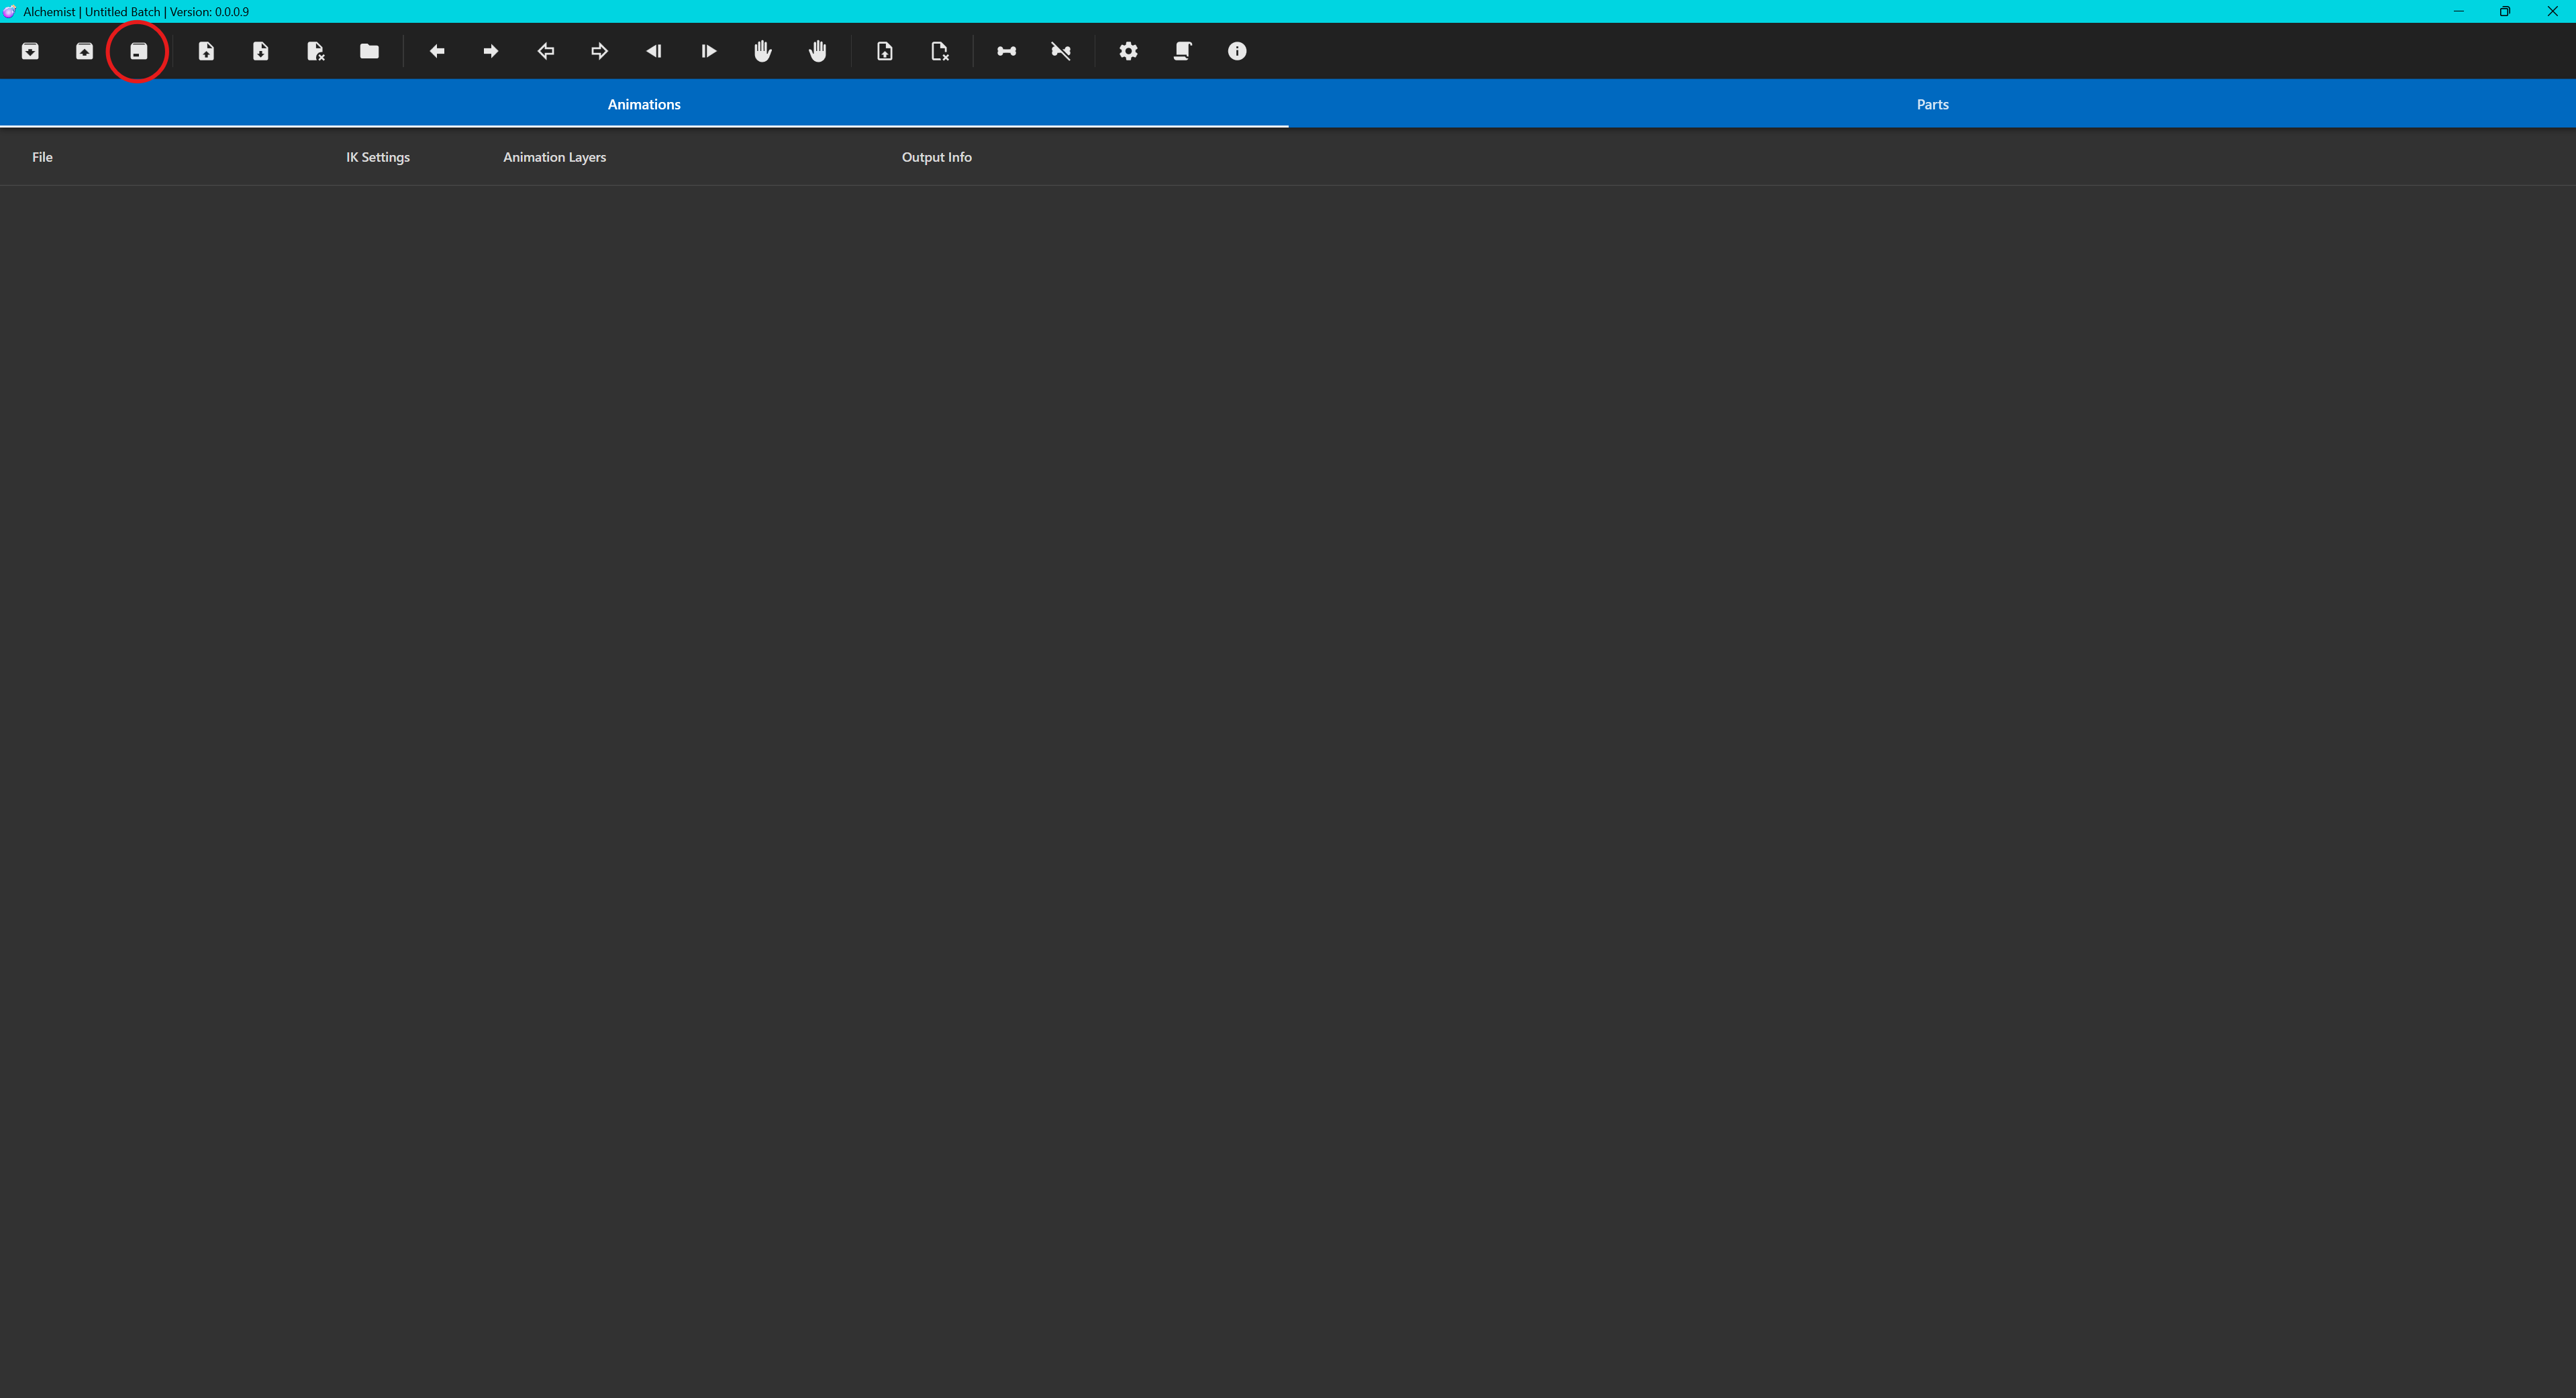
Once you open Alchemist you will start with a blank project, I first recommend you click the save icon or press C on your keyboard to save as new file. If you made the folders I suggested earlier, you can save this file in the Project Files folder, and make sure to give it a meaningful name, for example if I was doing the animations for the M4 from MW2022 (IW9) I’d call it iw9_ar_mike4 or something like that.
Now that our file is saved, we can intermittently save it using the B key on your keyboard or the save icon on the top bar (all shortcuts are listed in Buttons in Alchemist) so that we don’t lose progress.
Next, we can now drag and drop all of the base animations we want to use into Alchemist to start editing them. In this guide I will mostly cover just simple additives like sprints, but I will usually process all animations using Alchemist to solve IK at the least (even anims like idle and raise/drop etc).
For most additives, you will actually want to use just the regular idle animation (not idle_active, that is an additive itself that goes over the stock idle anim as well).
Since additive animations contain the actual movement for sprints, we want to use the idle to provide the base starting pose for the idle to sprinting motion.
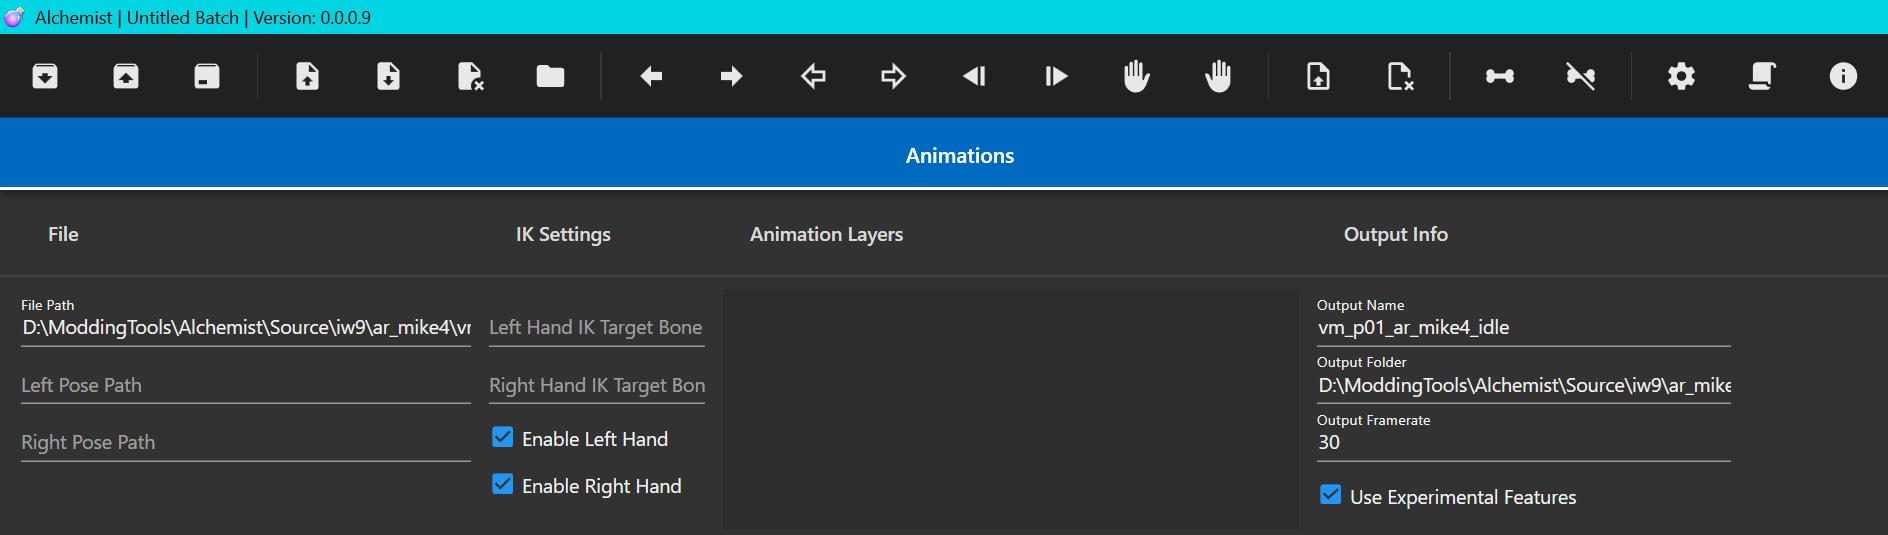
Once you import the idle animation and it shows as an entry on the list, we can start setting it up.
Pose Animations
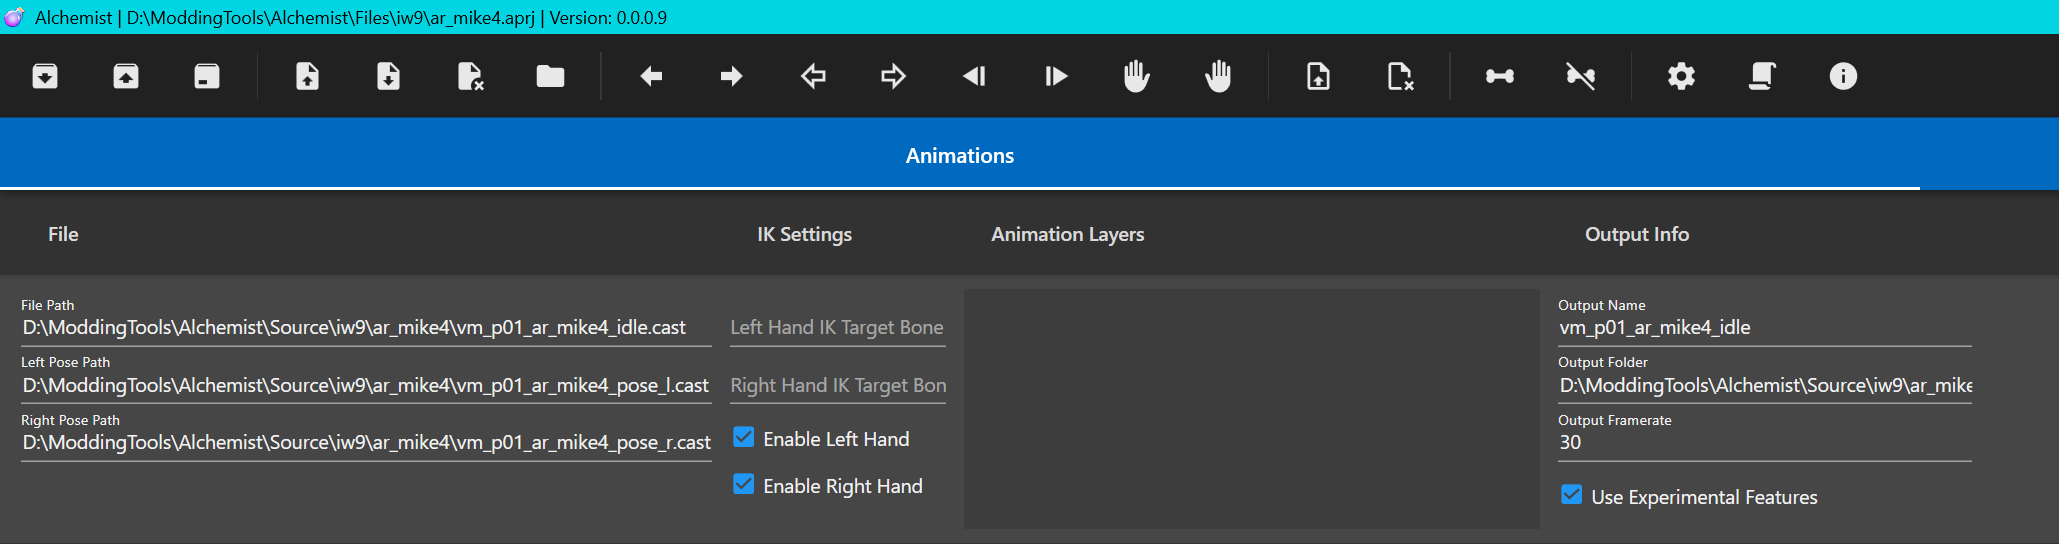
The first thing we want to do is set the hand pose additive animation, to do this we can left click the animation block we want to edit in Alchemist, and it will be highlighted. Then we can click the left or right hand icon on the top bar, or press N or O respectively for their shortcuts.
This will bring up a file browser, which we want to use to select the left or right hand pose animation. These are typically named in a way that you can recognise, such as _pose_l, or _hand_pose_l. If you can’t find the hand pose animation for you weapon of choice, it is possible it may reuse another weapon’s hand pose animation, or simply not have one. You can export the animpackage file type in Saluki for any game MW19, Vanguard and newer. This file will list all the weapon animations a weapon uses, and there you can find the reused hand pose if there is one.
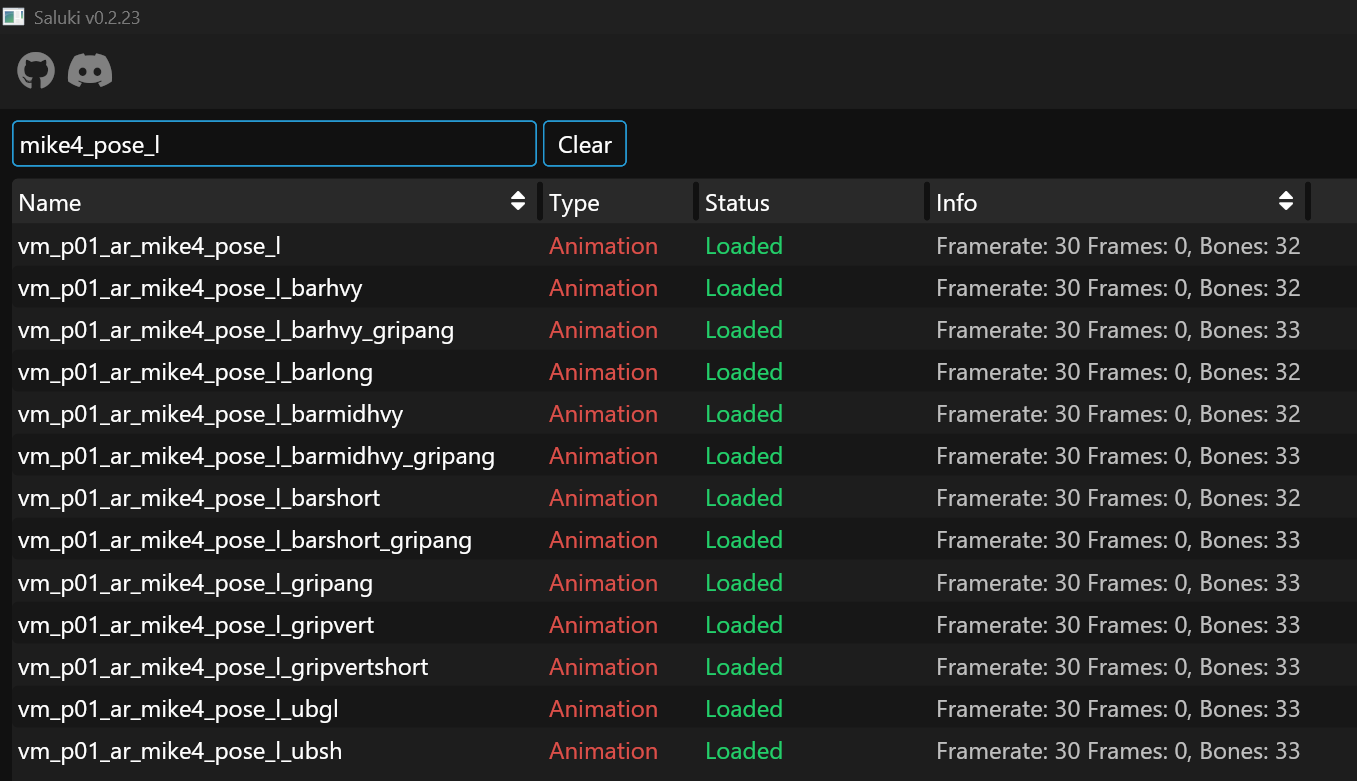
Make sure to set the right animation for left and right hand (if you plan on using an attachment that changes the hand pose like a foregrip, make sure to select instead the correct hand pose file for that attachment, typically named hand_pose_l_gripvert etc.).
Attachment IK Handling
If you are using an attachment pose, you can either set the Left Hand IK Target Bone line on the IK settings column to the name of the bone that the attachment uses (such as tag_ik_loc_le_grip) to use IK to put the hand there, or you can click the settings cog on the top bar and set the project’s global IK bone (this is usually better in most cases as you don’t have to set it for every single animations).
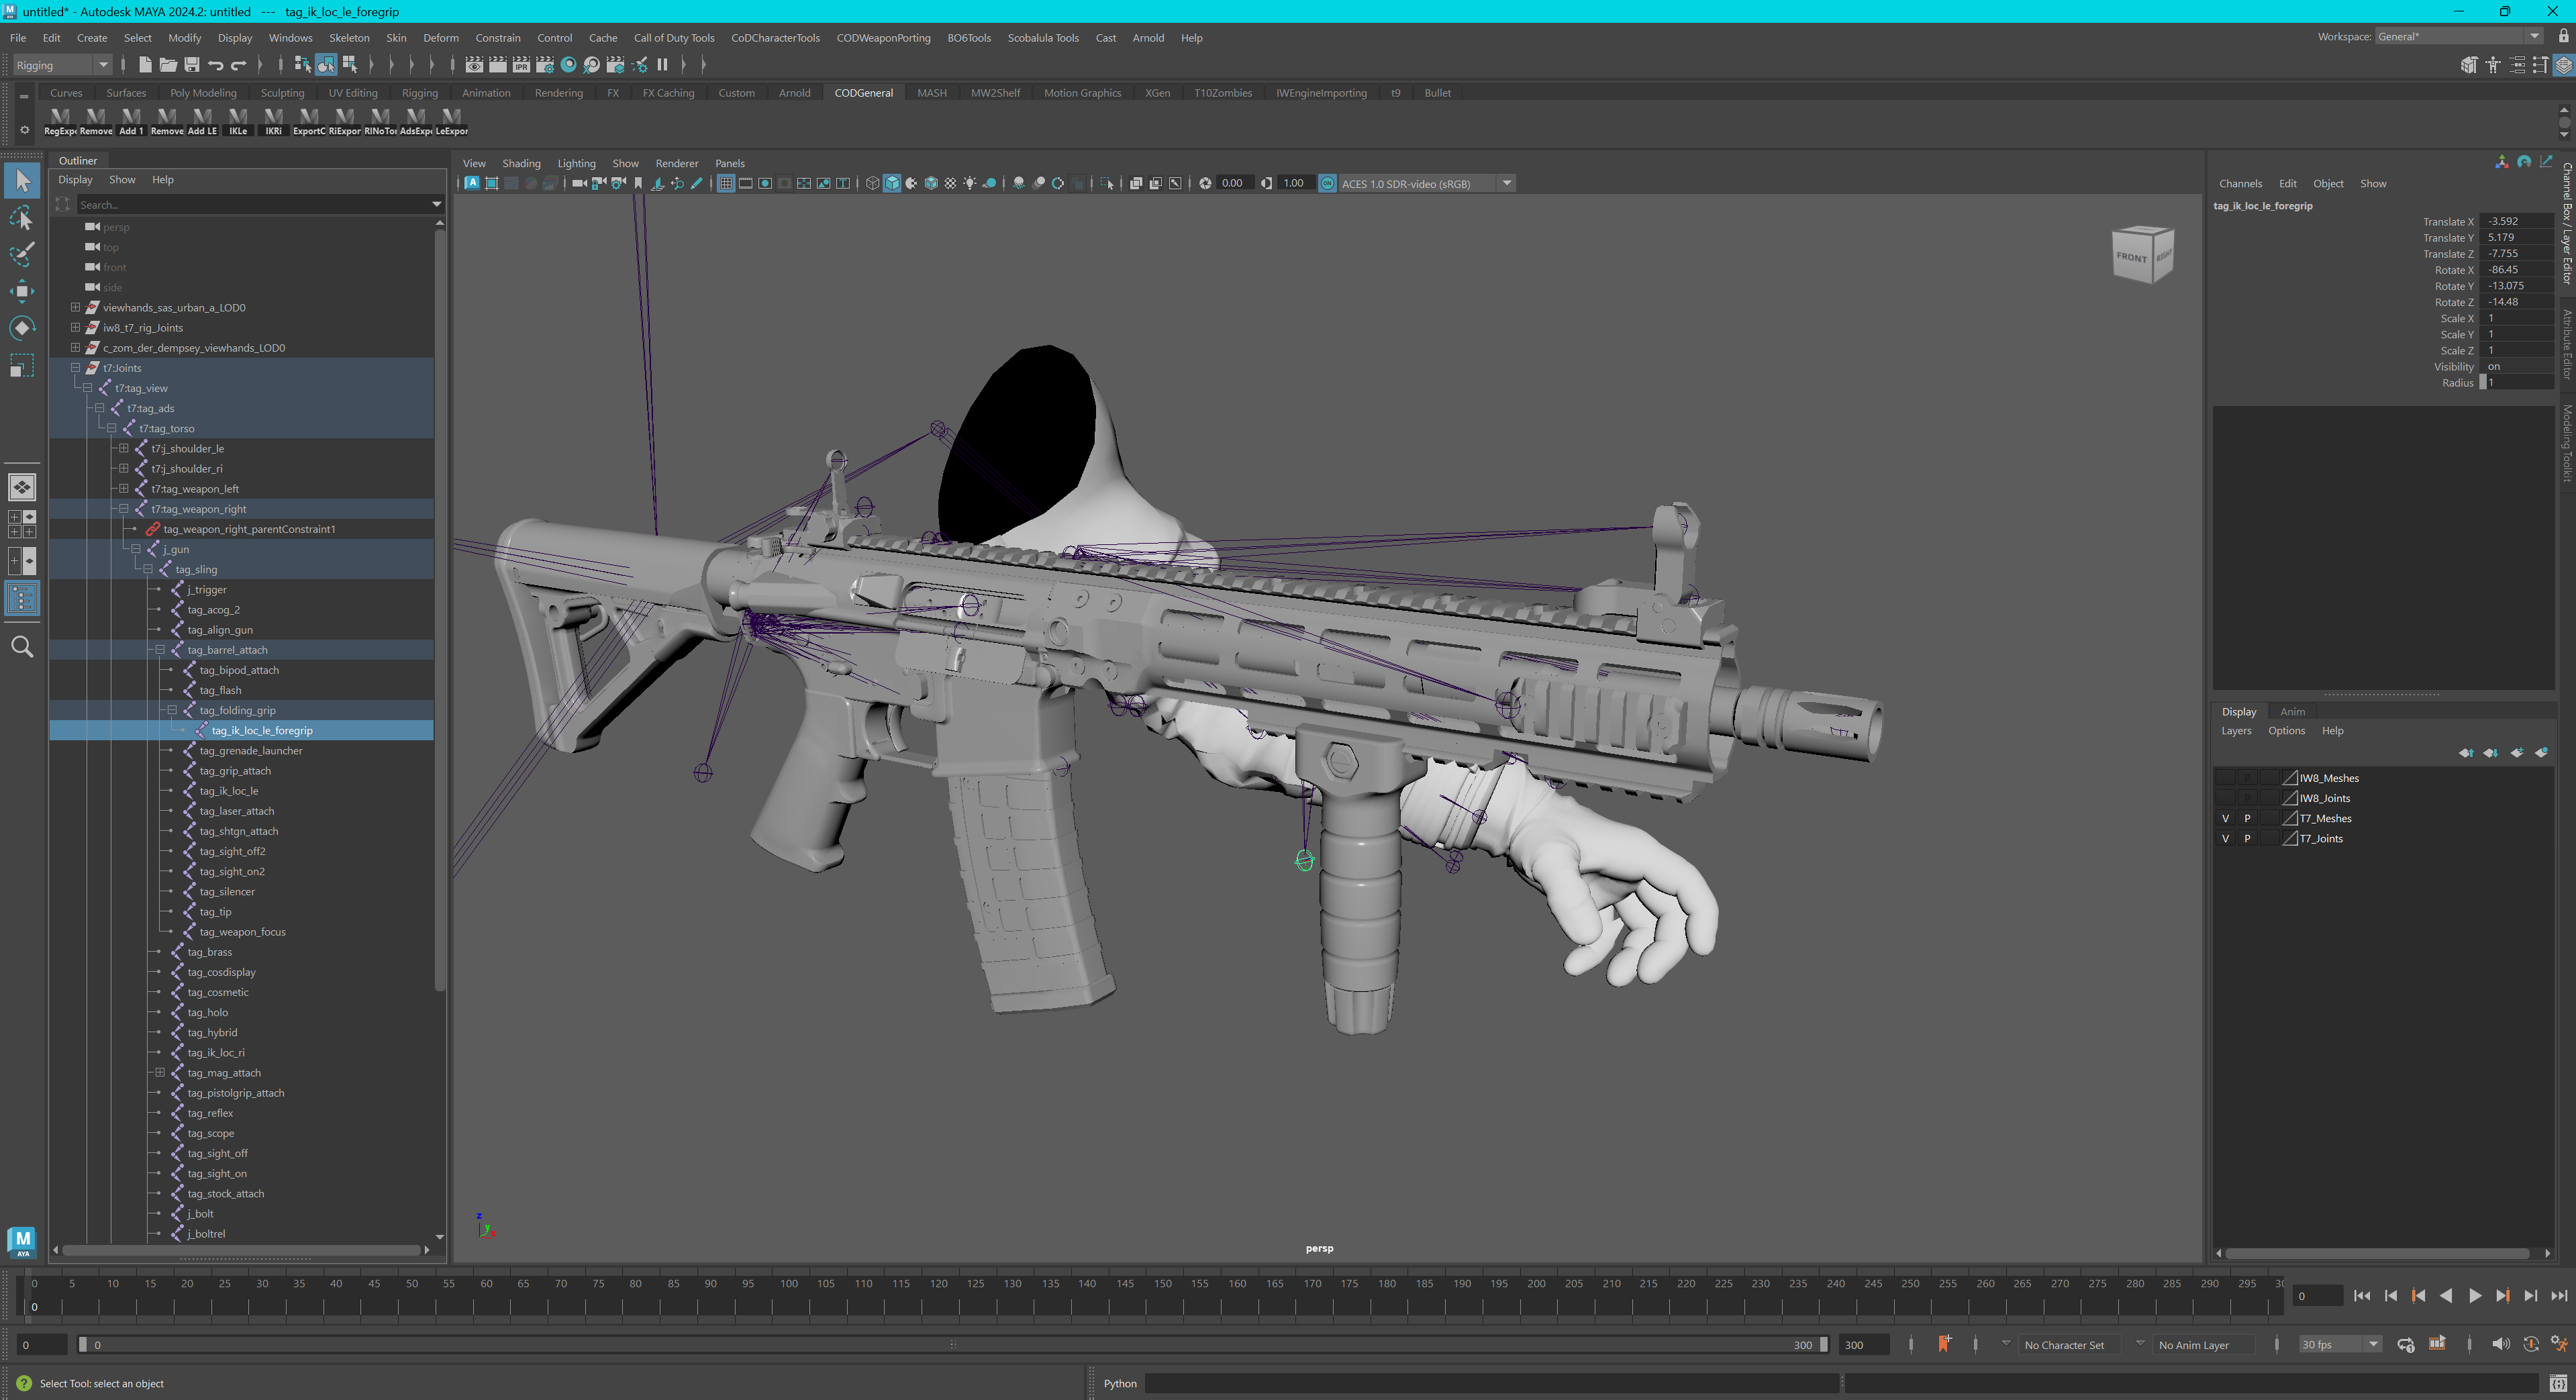
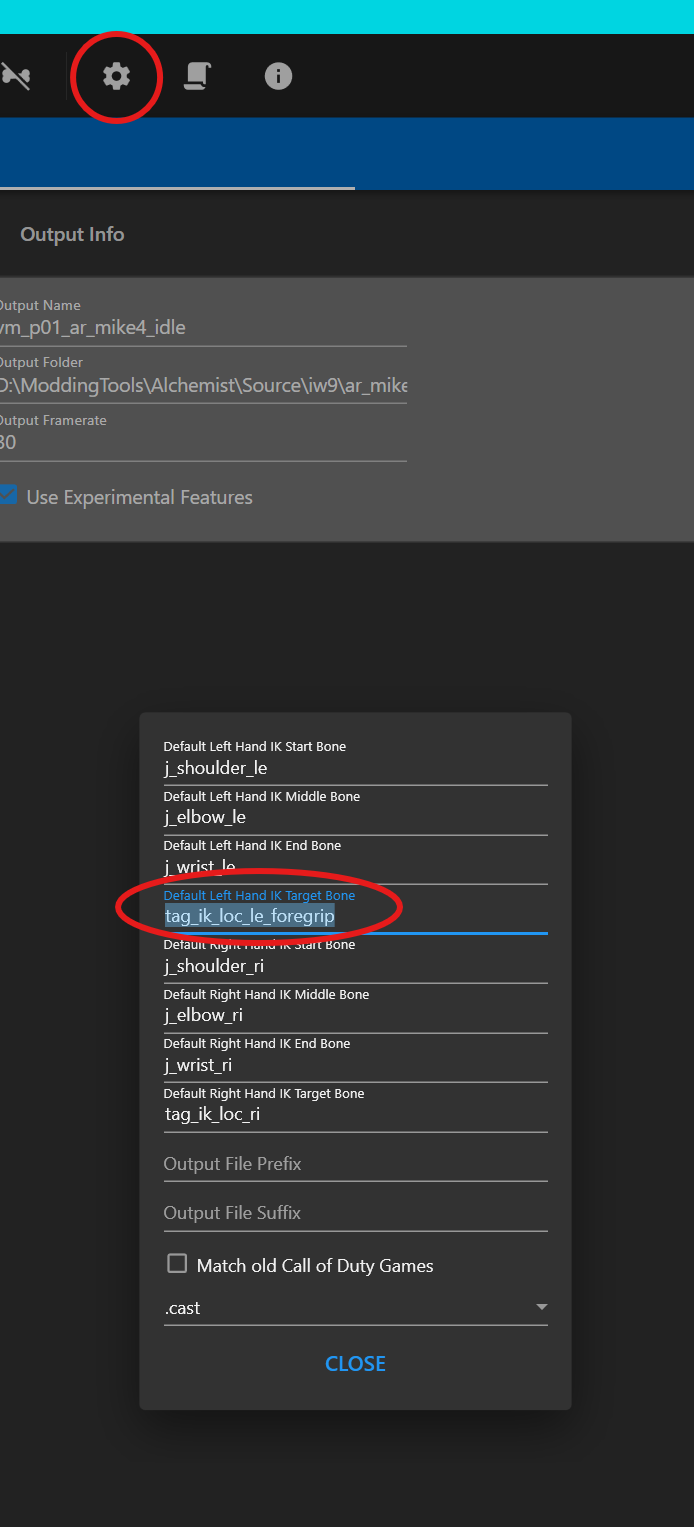
When combined with the unique hand pose this provides the correct look for holding the attachment during the animations (and don’t worry about reload anims etc, the notetracks on the animations are used just as they are in game to key in and out the hand pose and IK handle usage so the reload animation will still look normal and the hand won’t stay attached always to the grip).
Setting up the Parts
Now that we have the basic animation ready for putting additives onto, we should first take a look at the Parts section of Alchemist, this is where we define the skeleton for our animations to be processed on, using the viewhands file I linked earlier and your new merged weapon model.
First in this section, you should drag and drop your viewhand skeleton (ideally viewhands_mp_base_iw8_LOD0), you should see it create an entry for the model. You will see a few settings here, and we should pay attention for the hand s model to the 3rd setting, which will currently say Attachment. You should select this, and a drop-down will open with options, here we need to specify our hands model as the type ViewHands, so that Alchemist will properly use it.

Once that’s done, we can now drag and drop our merged weapon model in under the viewhands. This time, we don’t need to change the type from Attachment (the Weapon type is used for other purposes.) but we do need to set the Parent Bone Name setting. The parent bone name for most weapons will be just tag_weapon, but if this isn’t quite right (especially for gesture weapons) you can try other bones on the viewhands model to parent the view model to.
Now Alchemist is set up and able to technically compile our animations using this skeleton, but first we want to do the additives!
Adding Additives to our Animations
Now for the part everyone is probably here for, actually adding the additive animations! This part is quite simple but it does have some things you need to remember that I will go over for specific types of additives. The main piece of information to remember is that the order in which you apply additives DOES matter! This becomes especially clear with movement additives like walk/jog/sprint/supersprint as well as gesture animations such as slides which have left and right hand animations.
I will use a sprint in/loop/out animation as our main example here.
So, now that we have out idle animation ready with the hand poses etc, what we can do is duplicate it by selecting it in Alchemist and pressing CTRL+C to copy it (this can be done with multiple animations selected) and then pressing CTRL+V to paste (Alchemist may pause for a second whilst it process the copy and paste, especially when the project is large).
Then, we can rename the output of each animation in the Output Info column, typically you want to change the _idle suffix to _sprint_in, _sprint_loop, and _sprint_out (you will need to copy and paste the singular idle anim twice to get three entries).
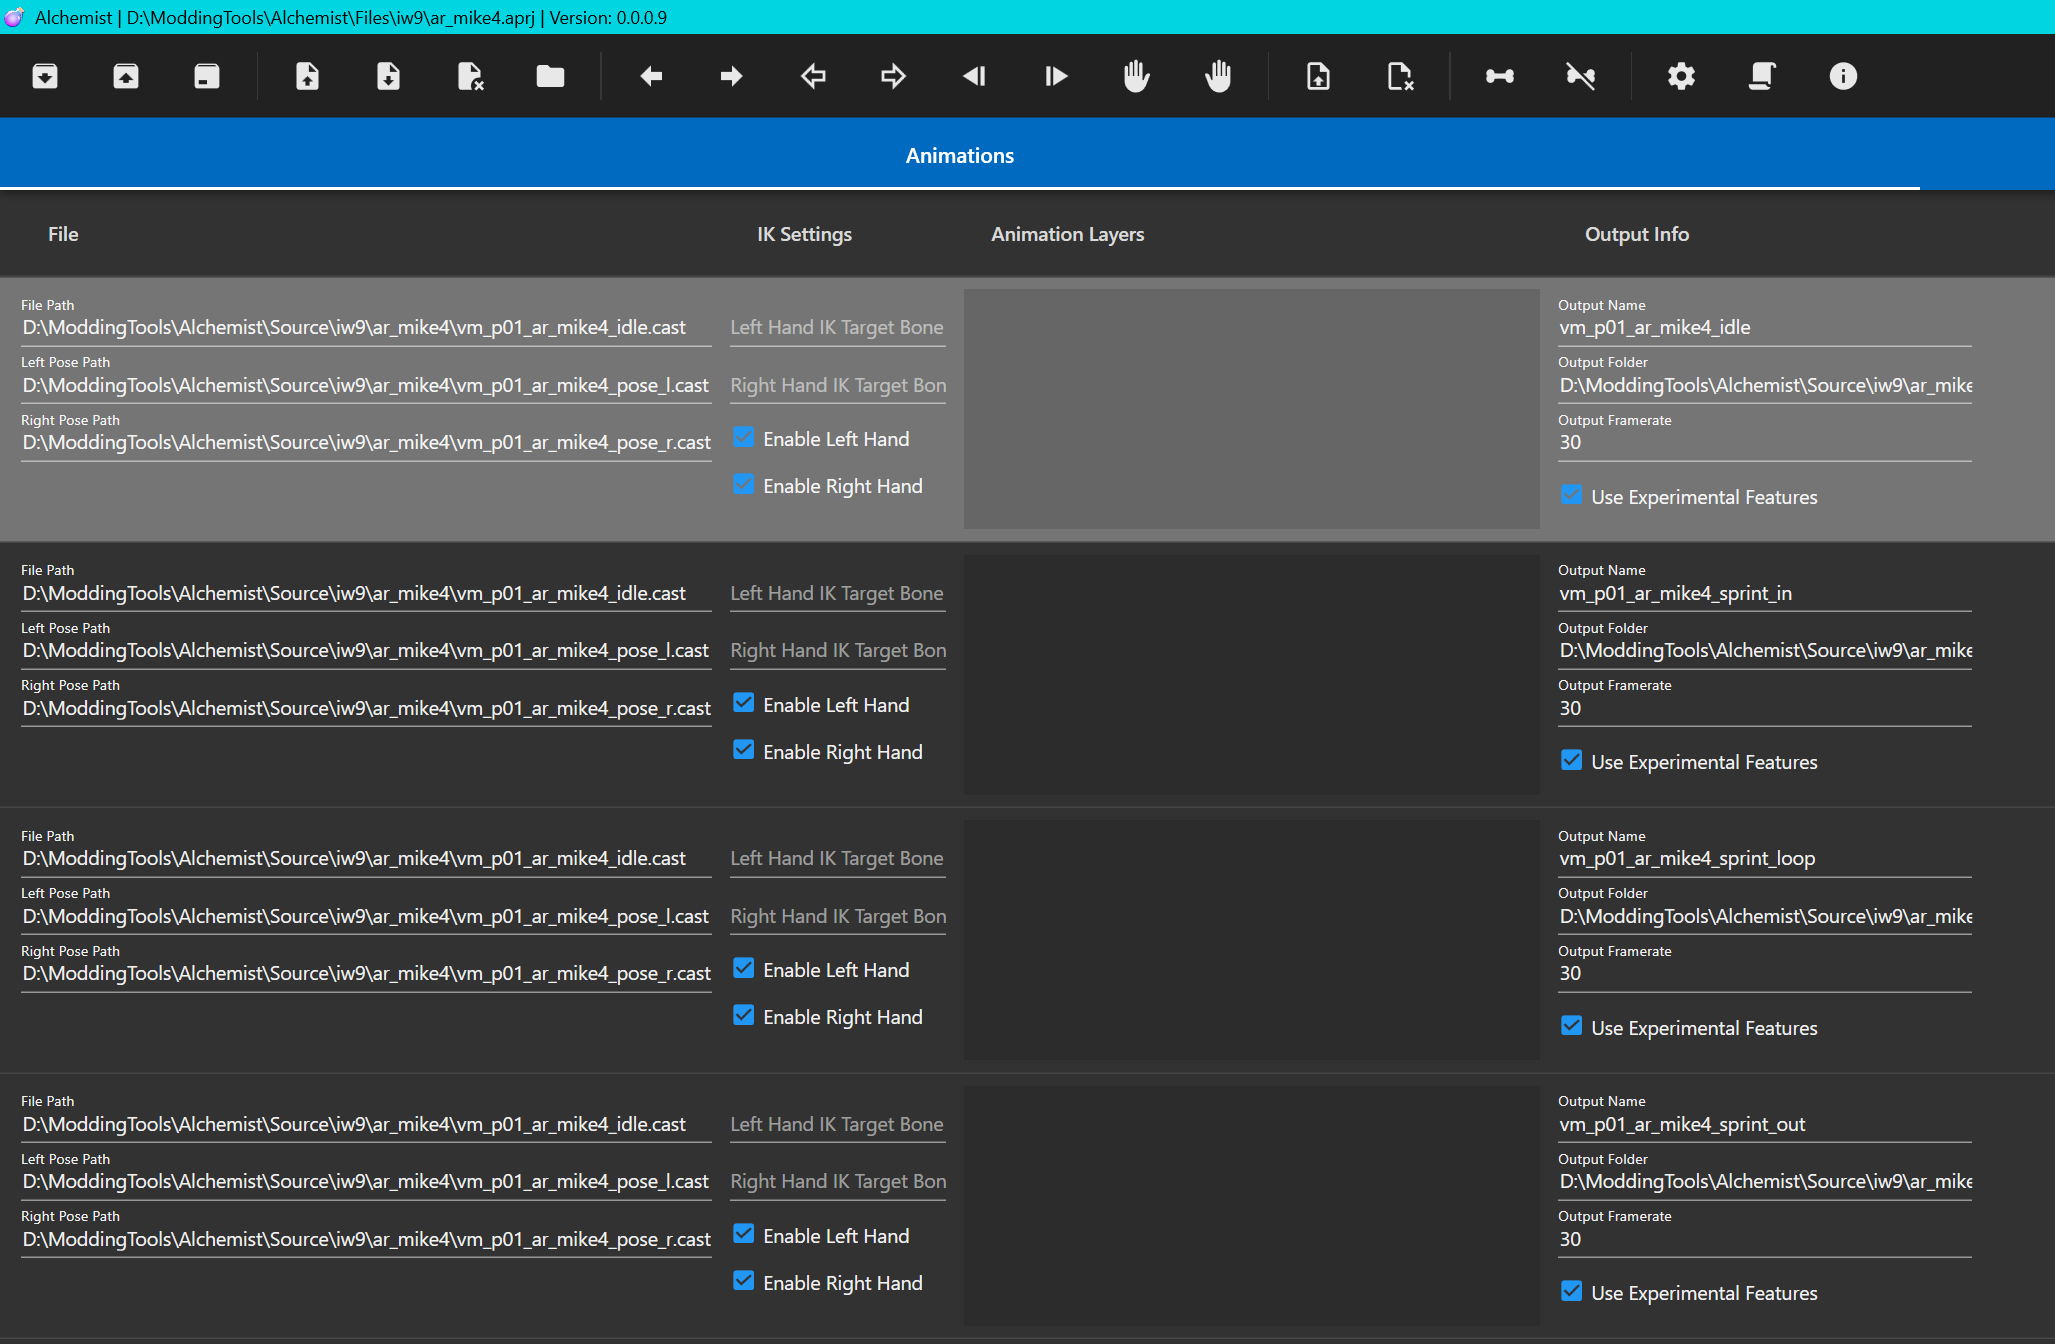
Now before we continue, it is also important to specify our Output path. We want to make sure we put these animations specifically in another folder so we don’t accidentally overwrite our source animations when we process them. To do this, select an animation and press CTRL+A to select all animations, then press the folder icon at the top, or press G on your keyboard. Then it will bring up a file explorer and ask you to select the folder to output the animations to, if you created the folders I mentioned in the start of the guide then you can select the Output folder (and personally I like to create a weapon specific folder inside the Output folder to keep the animations more organised).
If you haven’t already, make sure to save your progress with the shortcut key B or the icon on the top of the screen!
Now, we can drop the additives in. Let’s start with the sprint_in animation, select the entry and make sure its the only one selected. Now you need to find the source files for the sprints and walks for your gun, if you didn’t export them already. For any animations that go from state1 to state2, like walk to sprint, we need to use the walk_offset_additive first since we are technically still in the walking state until we finish the walk_to_sprint animation.
If you drag and drop the walk_offset_additive onto the animation layers column on your selected animation, it will add it as an additive entry.
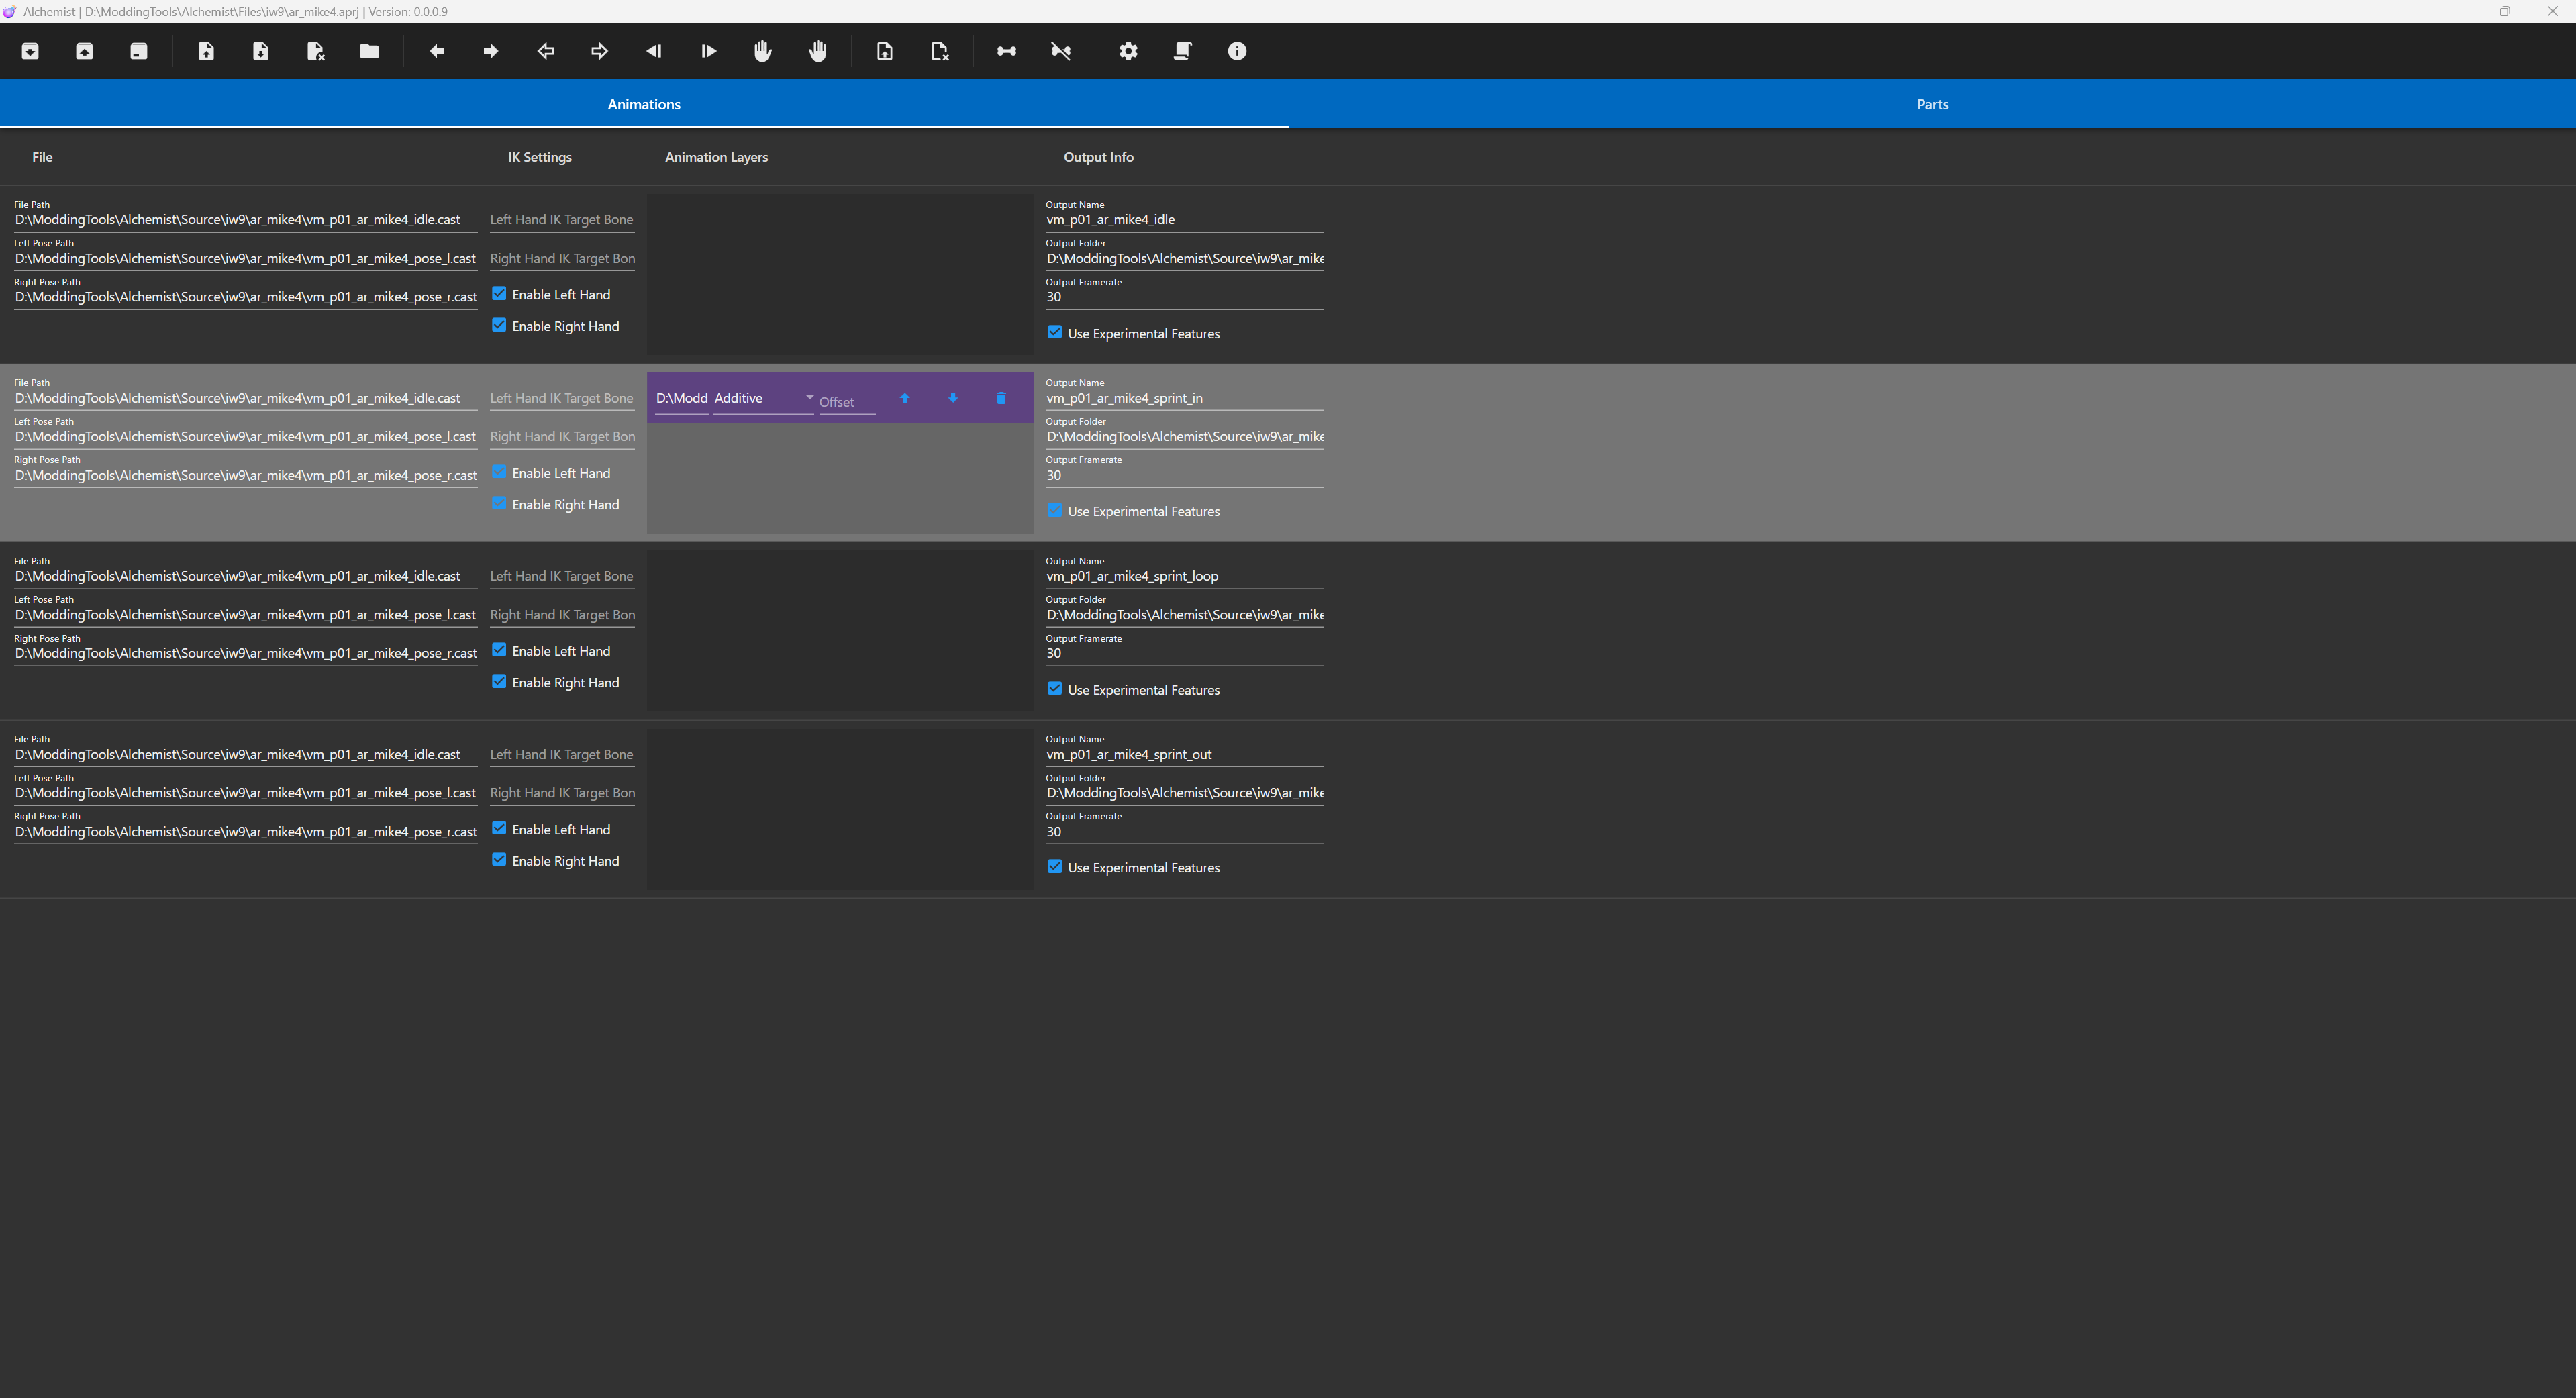
If the columns are too small and you can’t read what’s in them, press CTRL+Q to resize all columns to fit the contents of them (best to use Alchemist in full-screen mode for this).
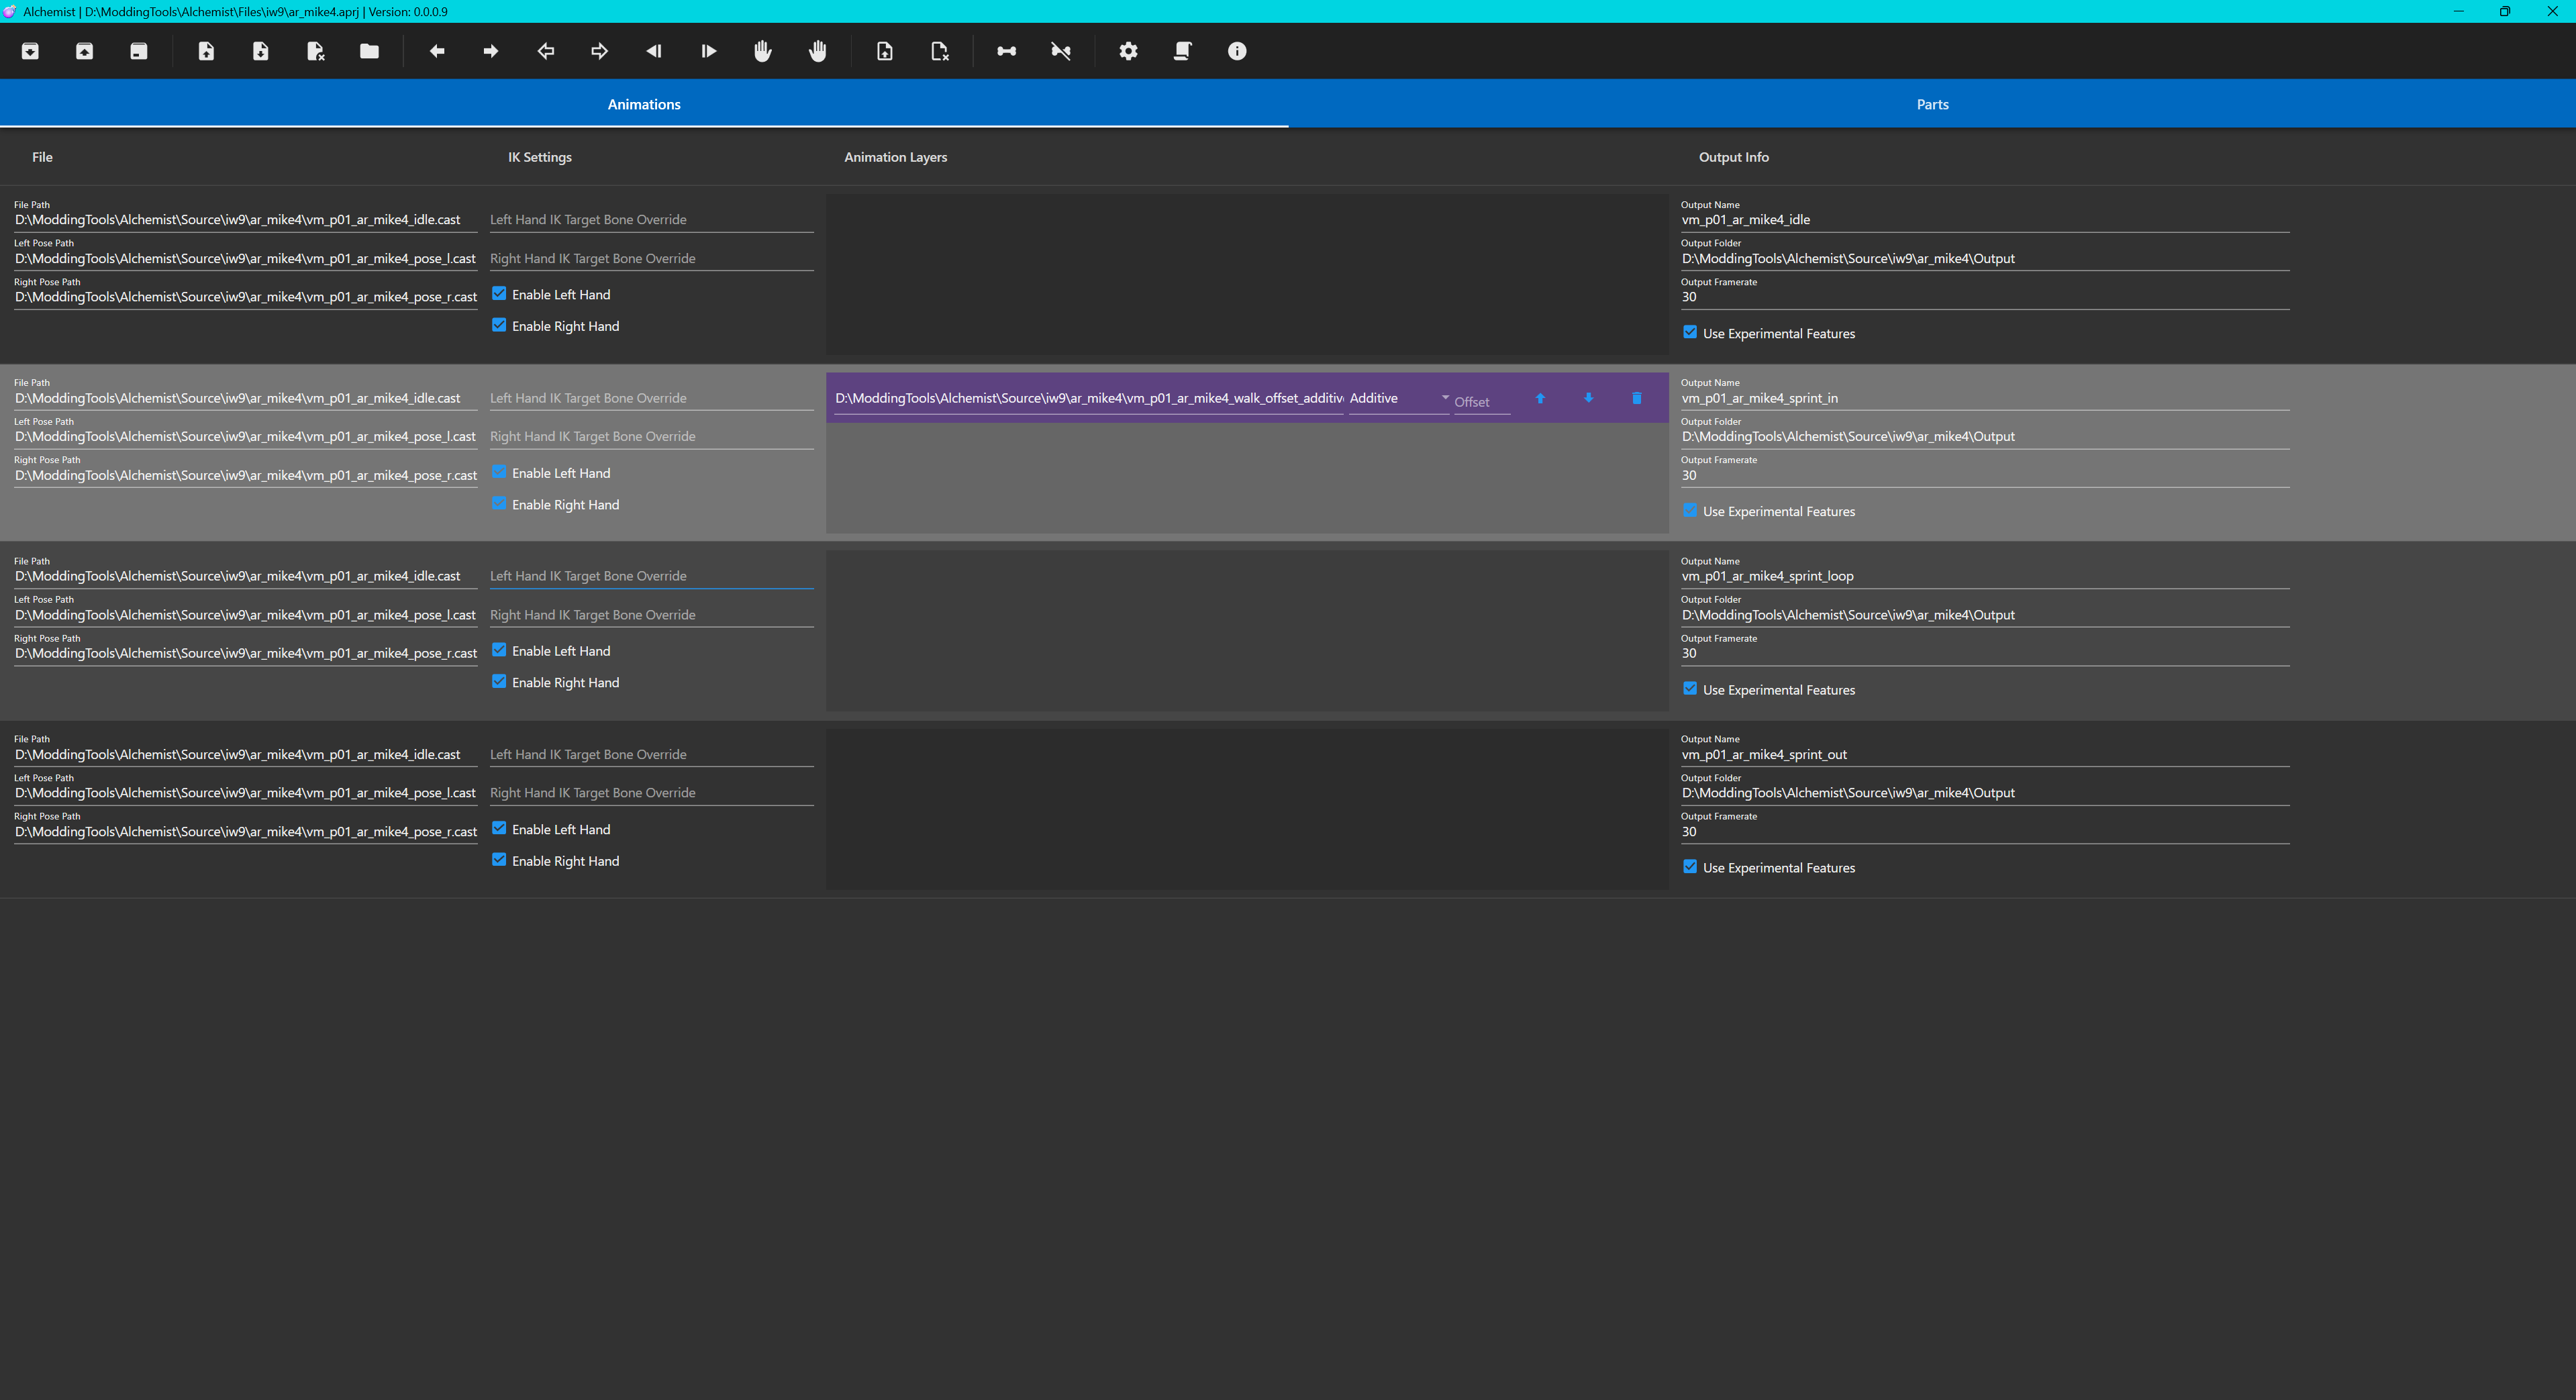
Now that we have our walk offset, we can then add in the walk_to_sprint animation, which contains the actual movement of the gun moving from idle to the sprinting state. Again, drag and drop the animation onto the right selected animation, and it should be added in under the walk offset additive. If you dropped them in the wrong order or it imported in the wrong order, you can click the up and down arrows on the additive anim to move it up and down in the list.
This should be our sprint_in animation complete! If you have your conversion rig scene ready with the gun in Maya, you can actually export the product of this now to test the outputted animation in there.
To export your current Alchemist project file, click the file with a down arrow icon, or press E. If you encounter an error popup and Alchemist closes, don’t worry, an autosave will be made if this happens. This means that Alchemist is missing some information or something is not quite set up right in the project file, make sure to double check your setup and that everything is right. If it succeeds, the output folder should now contain your new animations, which you can import as usual to your conversion rig.
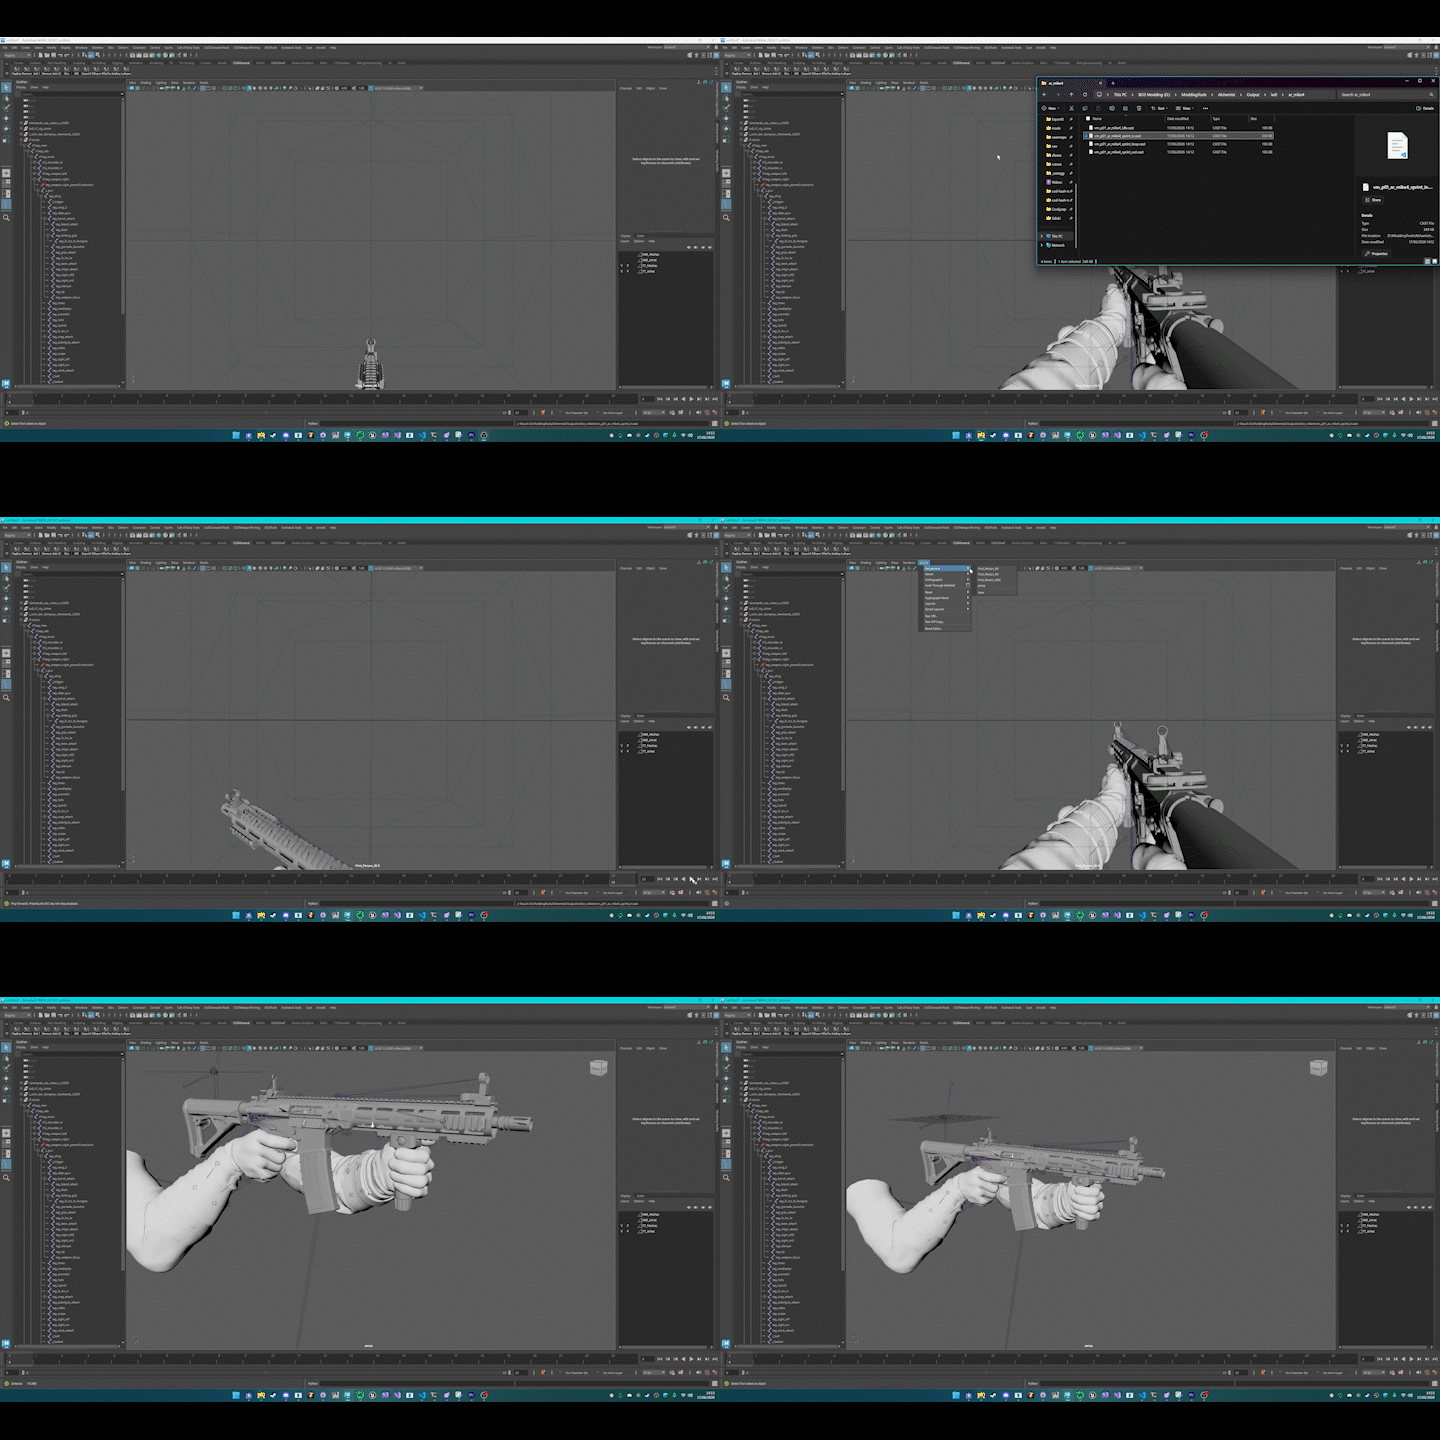
Now, I will demonstrate the sprint_loop and sprint_out, which are very similar.
For sprint_loop, you now need the sprint_offset_animation first, as we are now in the sprinting state. Then drop in the sprint_loop animation underneath that. This should be the correct setup for your sprint loop.
Something to note is that some sprint_loop animations will not key out the IK correctly, and so you can uncheck the Use Left Hand IK setting to make it so the hand does not stay attached when it should not (applies to a lot of pistol sprints).
The sprint_out is the same as sprint_in with walk_offset_additive first, except now after it we import sprint_to_walk instead of walk_to_sprint.
That should be the 3 sprint animations you need now all put together!
I will quickly go over slide animations as they use the slightly different left and right hand gesture animation additives, which can throw people off.
Gesture Animations for Slides
You can choose which slide animations to use, personally I like to use the additives from Infinite Warfare as they fit BO3’s sliding system better than the newer animations. That’s the nice thing about additives, is that since the engines are quite similar with their viewmodel animations, you can mix and match some of them! I even use the IW slides on BO7 weapons.
I have linked my folder of General Source Animations which contains things I use on most weapons like the aformentioned IW slides.
Once you get your desired slide anims (either exported yourself or from my link), we can now set them up.
In your project, I recommend copying your idle anim setup again that has the hand poses etc, and pasting it four times (slide_in_air, slide_in, slide_loop, slide_out).
The slide_in_air anim is used for starting a slide from idle, which you are in when jump sliding.
For the slide_in and slide_in_air anims, we want to first import the left hand gesture additive, in my case it’s vm_gesture_default_slide_in.
Now, on the additive animation’s settings, we want to select the type drop-down and set the left hand gesture additive to Gesture.
Gesture additives are handled differently to regular additives and so need this setting.
Now, we need to also import the right hand anim, vm_gesture_default_slide_in_rhand. This time instead of setting it to Gesture, we set it to Gesture Pose.
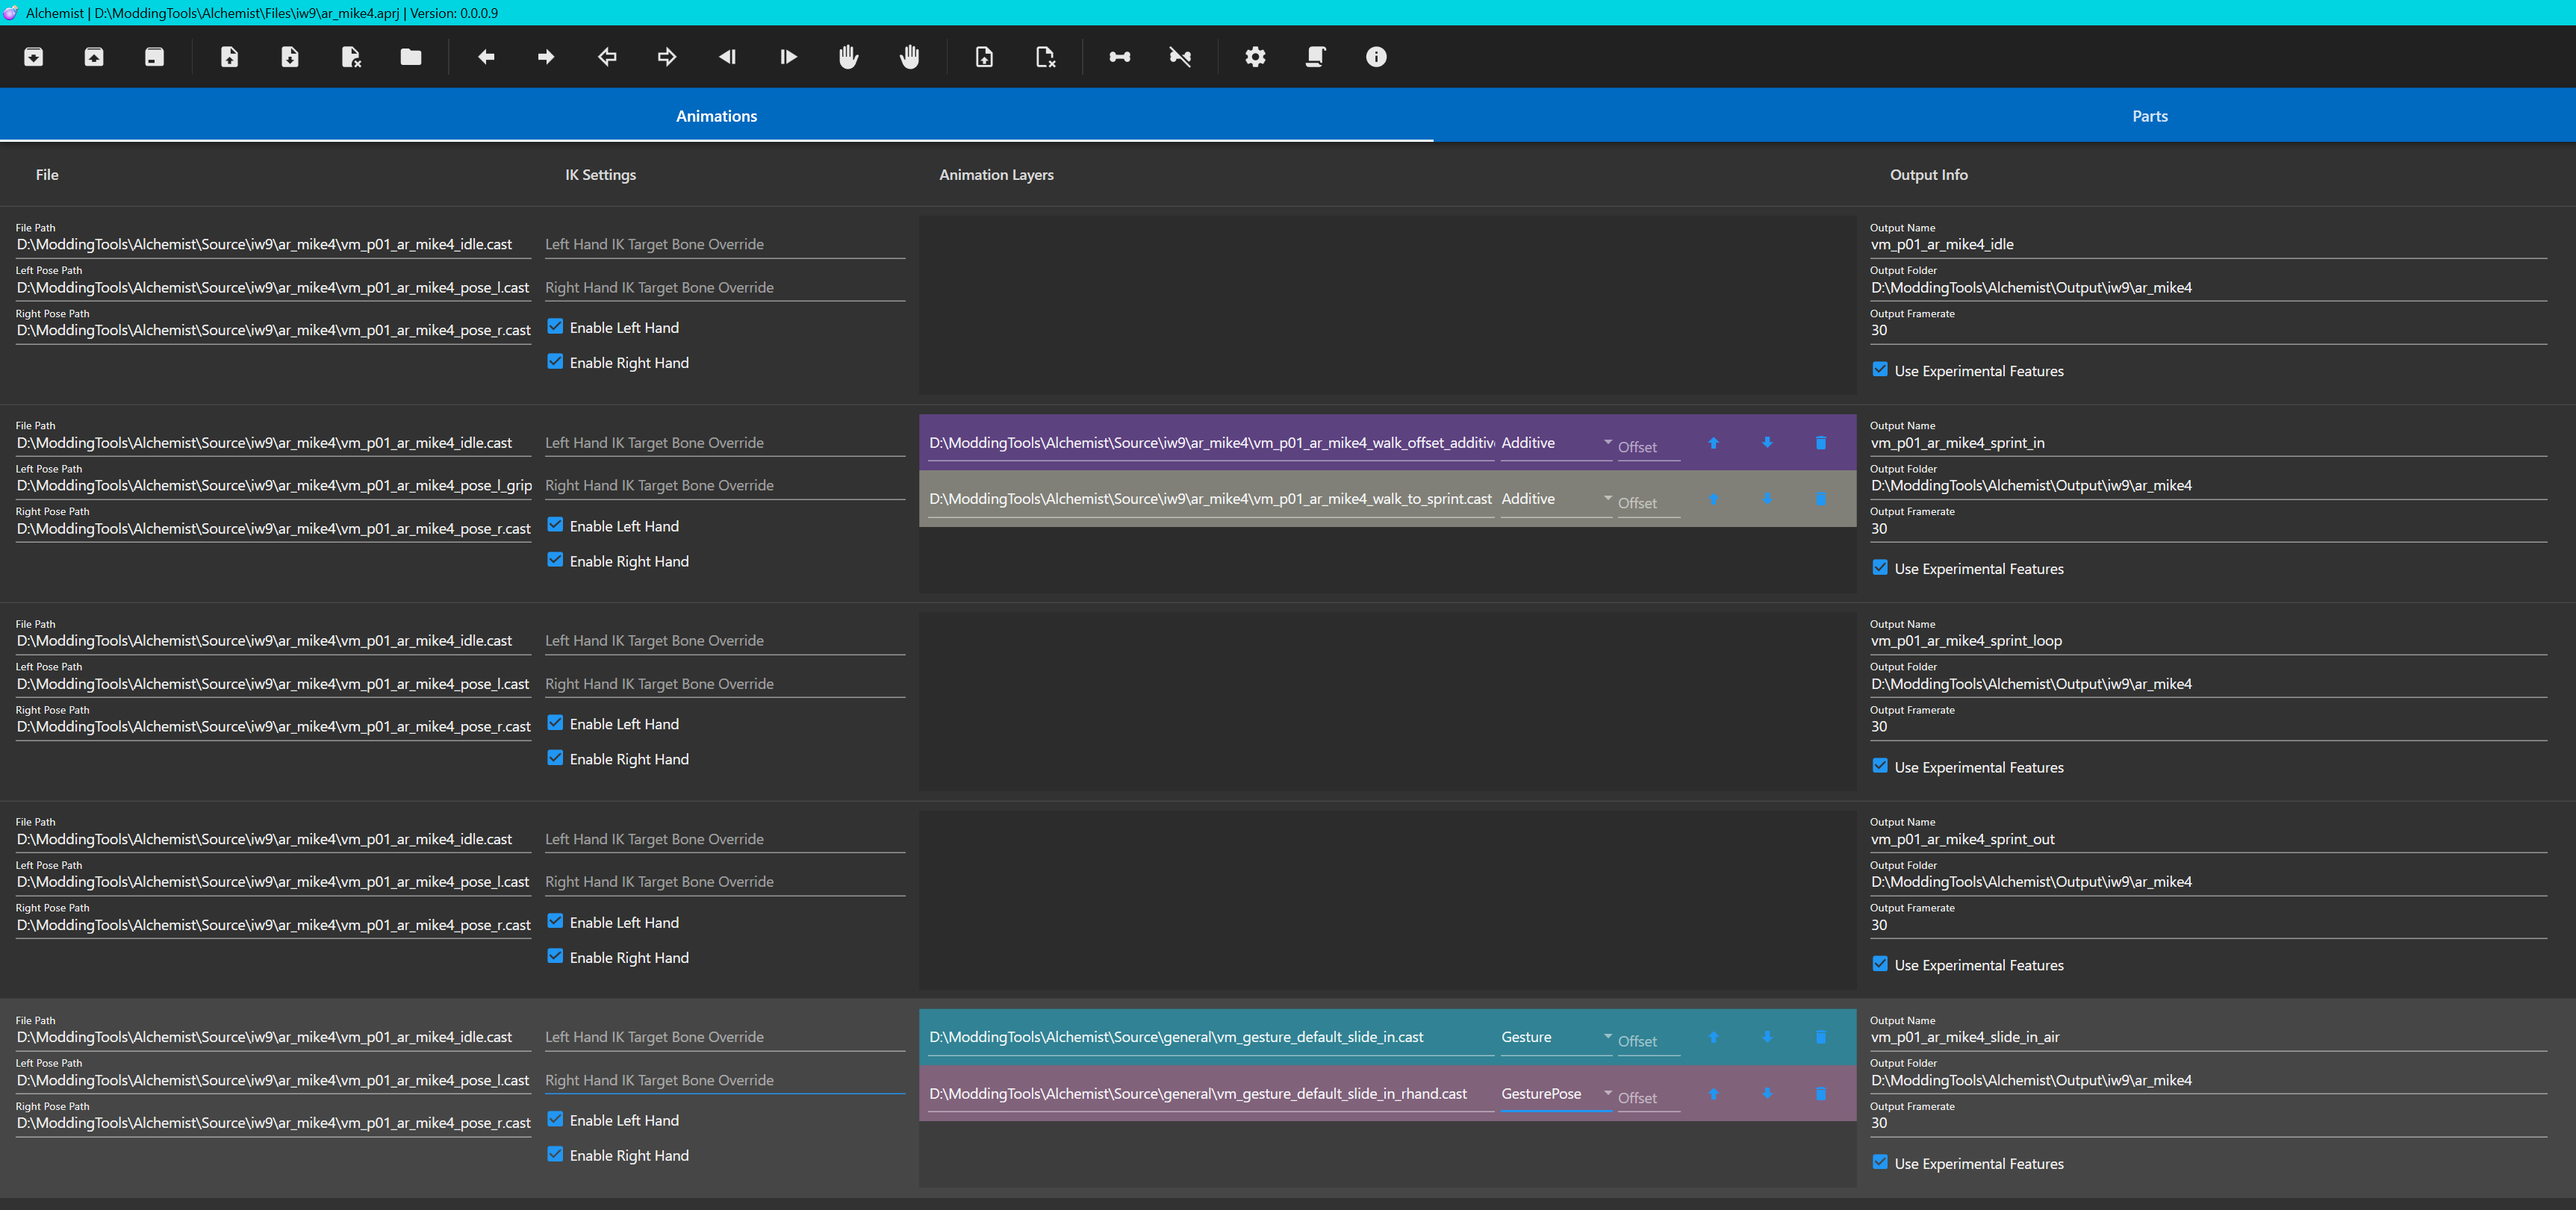
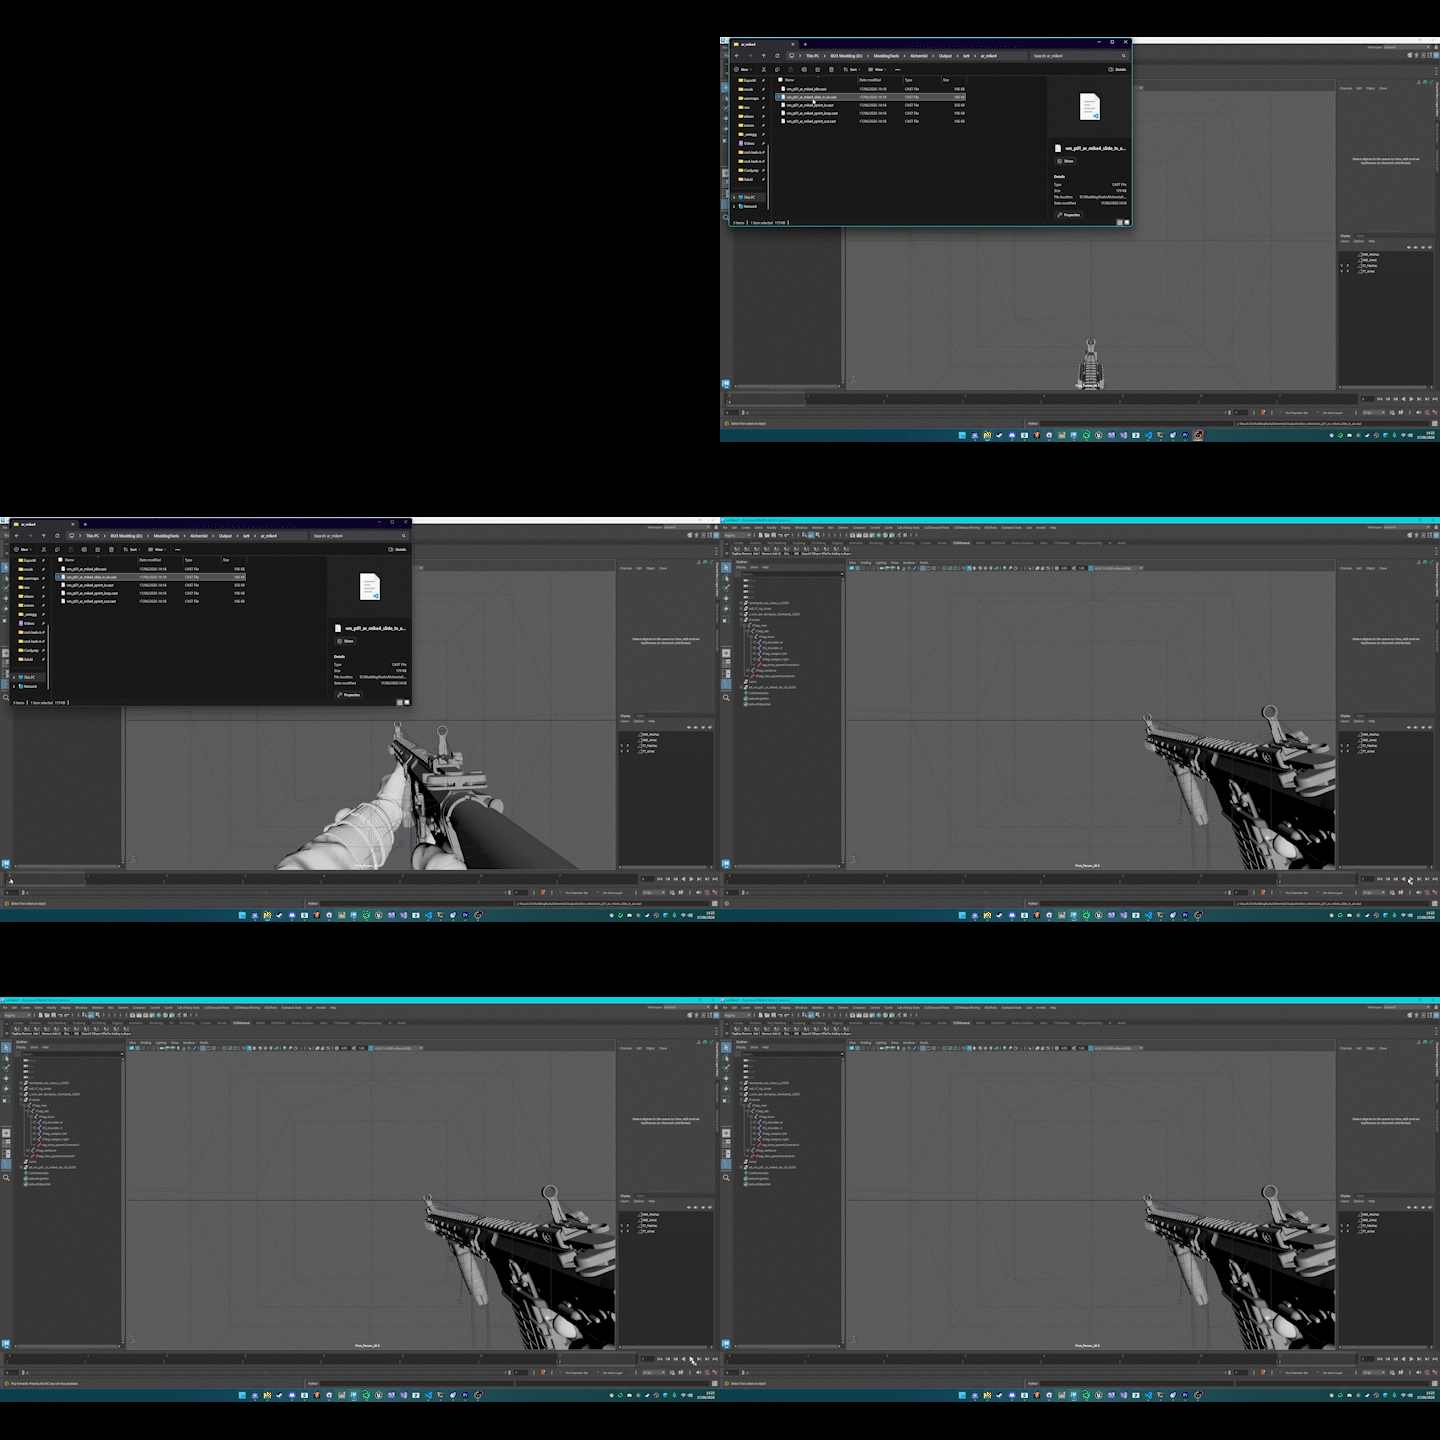
That’s basically it for Gesture type additives, they aren’t difficult to set up, just require a couple unique settings due to their nature. You apply the same logic for slide_loop and slide_out, just make sure the right hand Gesture animation comes after the left hand one. (Order matters for additives)
The slide_loop also has the same issue as some sprint loops where the left hand IK setting must be disabled otherwise the left hand will attach to the IK handle on the gun still (there is no notetrack to unattach the IK since in engine that is usually done on slide_in, which isn’t a part of this seperate slide loop animation.)
In the summary below I explain what you need to do for the slide_in compared to slide_in_air to get the different animation.
Summary
That marks the end of this setup guide, hopefully you get the general idea of what Alchemist can do for you and how it works. Sprints are the basics, but you can do even more cool things, for example if you want a sprint to slide animation for BO3, you can set up the slide in additives on an animation, and use your outputted sprint_out animation as the base animation for it, and it will overlay the slide_in additives with the sprint out animation, which means your slide in from sprint ends in the same end pose as your idle to slide animation (slide_in_air) which is what you usally see when bunny hop sliding.
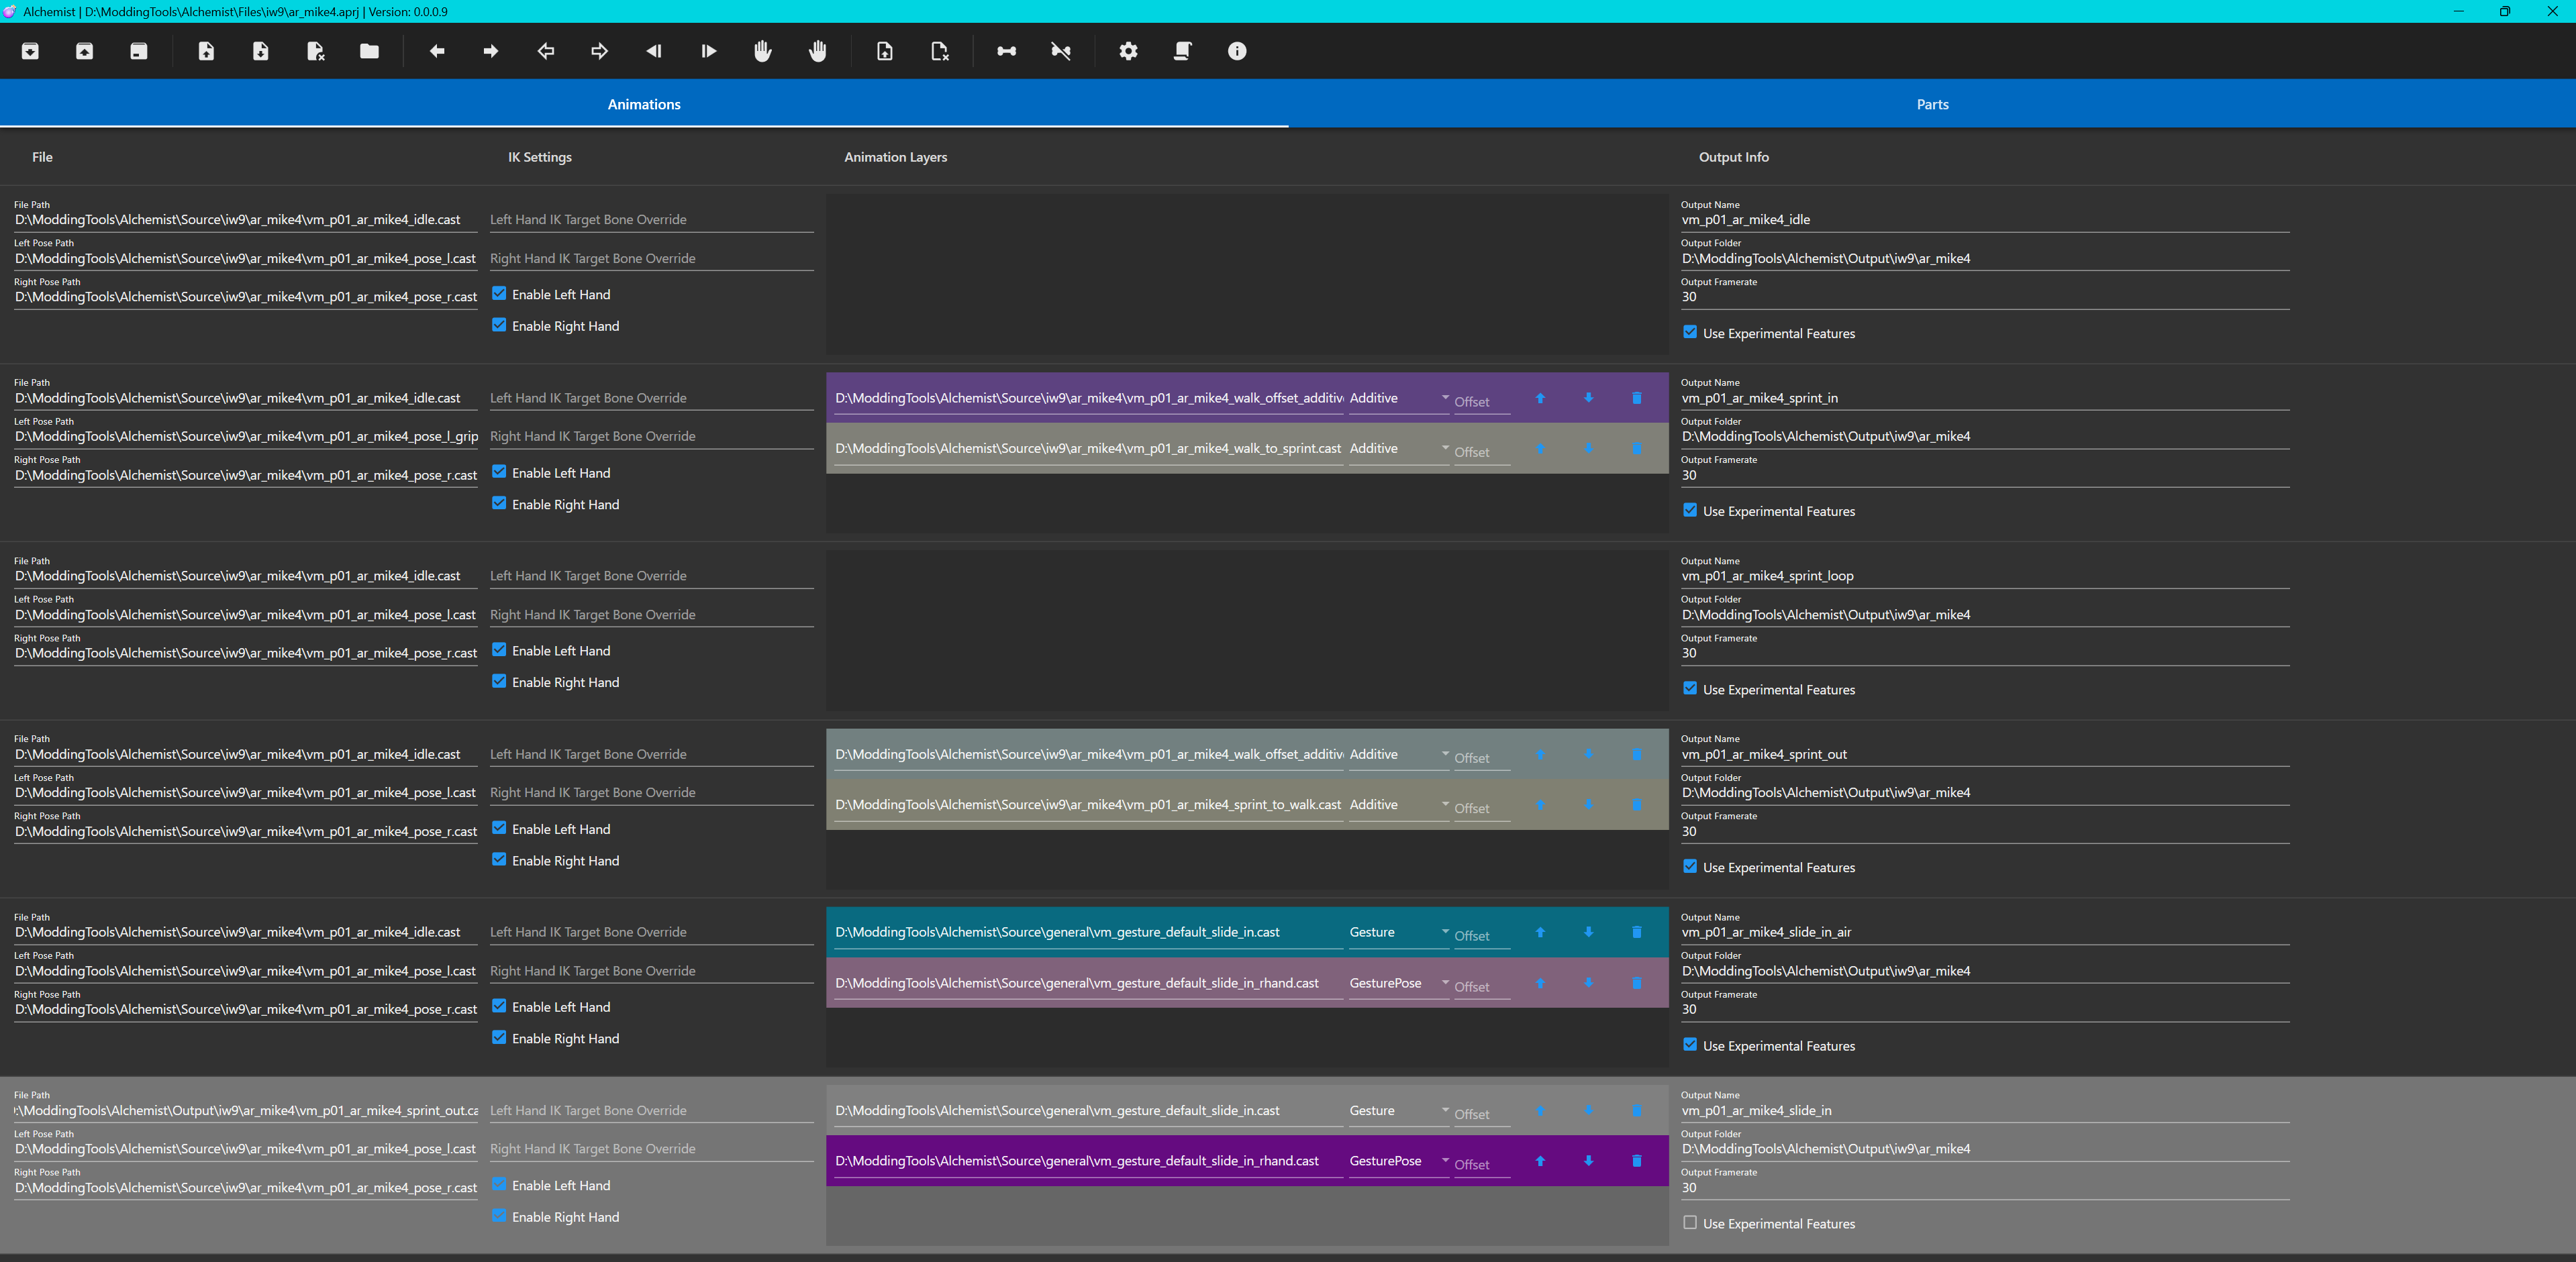
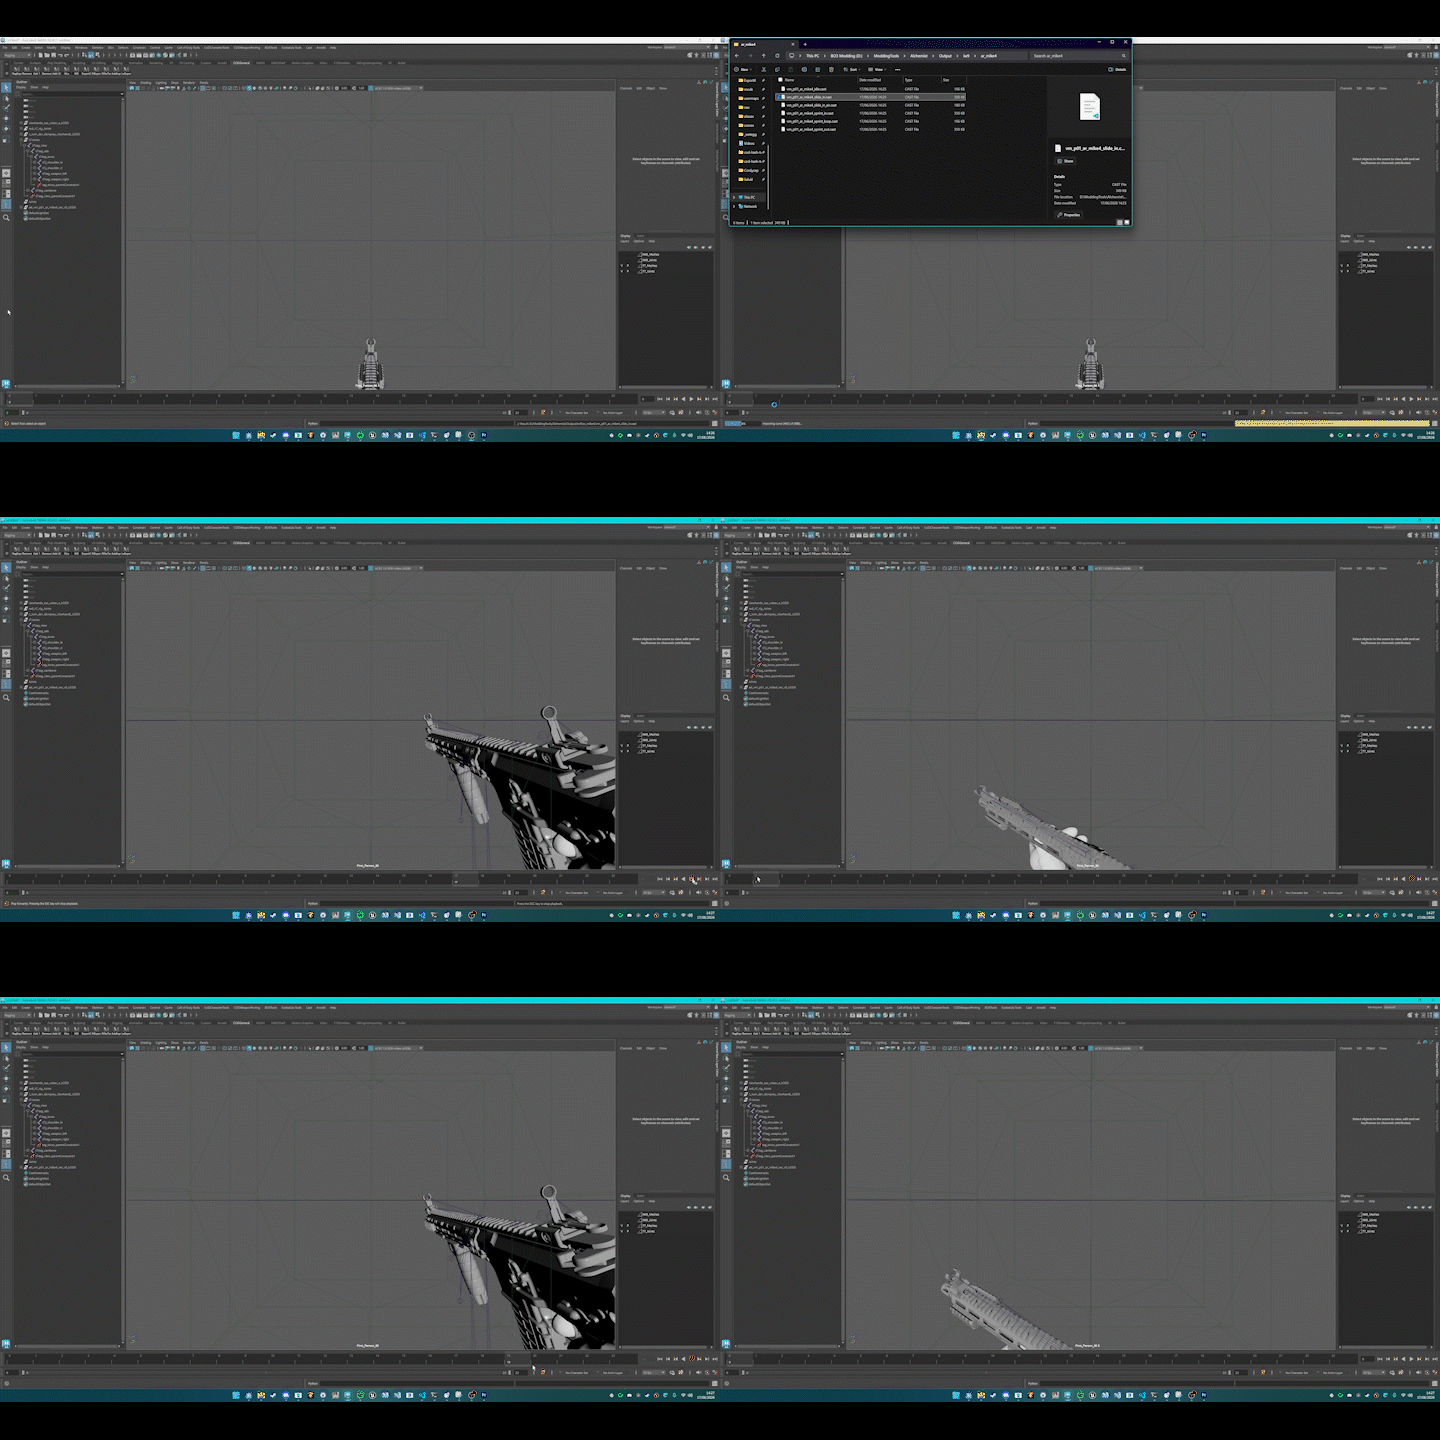
Credits
Guide written by WetEgg.
Credit to Scobalula for making Alchemist.
Credit to ThomasCat for making the IW8-T7 conversion rig.
Credit to echo000 for making the Cast fork of ModelMerger.
Was this page helpful?
Glad to hear it. Please tell us how we can improve.
Sorry to hear that. Please tell us how we can improve.